

Emails are central to any successful business operation. Emails are widely used and accessible to a large audience. This makes emails the perfect solution for communication between businesses and consumers.

That being said, setting up a reliable mailing system can seem daunting!
Setting up your own SMTP server can prove a challenging burden for many business parties. Maintenance and security of the servers burn up a lot of resourcing, not to mention prevention of emails from being classified as spam.
Email management is a common and shared problem among so many businesses, making it a perfect storm for many solutions. We live in a world with infinitesimal solutions all clamoring for a piece of the pie. With so many options and solutions available, it's hard to pick which resource to leverage!
How about we examine one solution that indisputably makes our choice clear?
Let's talk about Firebase and its new Trigger Email Extension tool and how I set it up for this blog to automate email triggers.

That's how I got to the mailing extension. Recently, I surveyed Tech Twitter with a poll for feature interests in a blog. Surprise surprise!
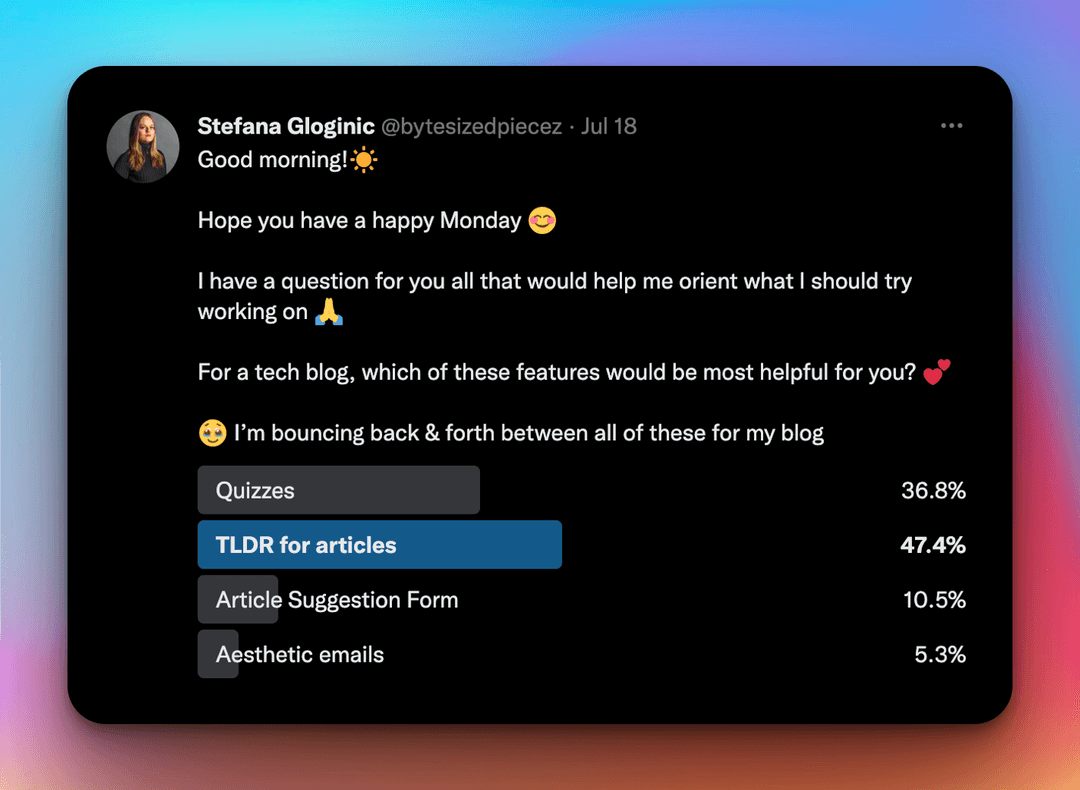
Quizzes were a runner-up to TLDR, with 36.8% interest!
I turned to Firebase to store the quizzes I create as well as the answers supplied by my readers.
Quickly I realized I want to be kept in the loop when I received a submission from my readers. Automated emails seemed the most appropriate way to stay in the loop on answer submissions.
Without further introduction needed, how about we dig into Firebase's Trigger Email Extension.
What we will cover
- What the Firebase Trigger Email Extension is
- How the Firebase Trigger Email Extension works
- How we can set the Firebase Trigger Email Extension up
- How we can programmatically trigger emails with the Firebase Trigger Email Extension
What is Firebase's Trigger Email Extension?
According to Firebase documentation:
The trigger email extension allows us to render and send emails that contain information from documents added to a Cloud Firestore collection.
We can set up the extension, send a test email, and observe the states the email undergoes through the user-friendly Firebase Console platform!
How does the Firebase Trigger Email Extension Work?
Add a document to your own specified collection to automatically trigger the extension and send an email built from the submitted document's fields. We can be specific as to the contents and recipients of the email through the supplied information in the document.
Provide to Firebase the collection you've created to serve the purpose of automated email sending, add the desired recipient of the email, as well as the message breakdown. Our message could contain the subject, HTML, and text. We can optionally add attachments, which are paths to stored files and more.
You can also optionally configure the extension to render emails using Handlebar templates. Each template needs to be a document stored in a Cloud Firestore collection.
Note that Firebase does not serve as our SMTP provider, which is why we will need SendGrid to generate the appropriate credentials that Firebase will need to consume. Be aware we are not forced to use SendGrid as our provider.
Some SendGrid alternatives:
As long as the SMTP provider is a bulk email service provider, Firebase can work with it.
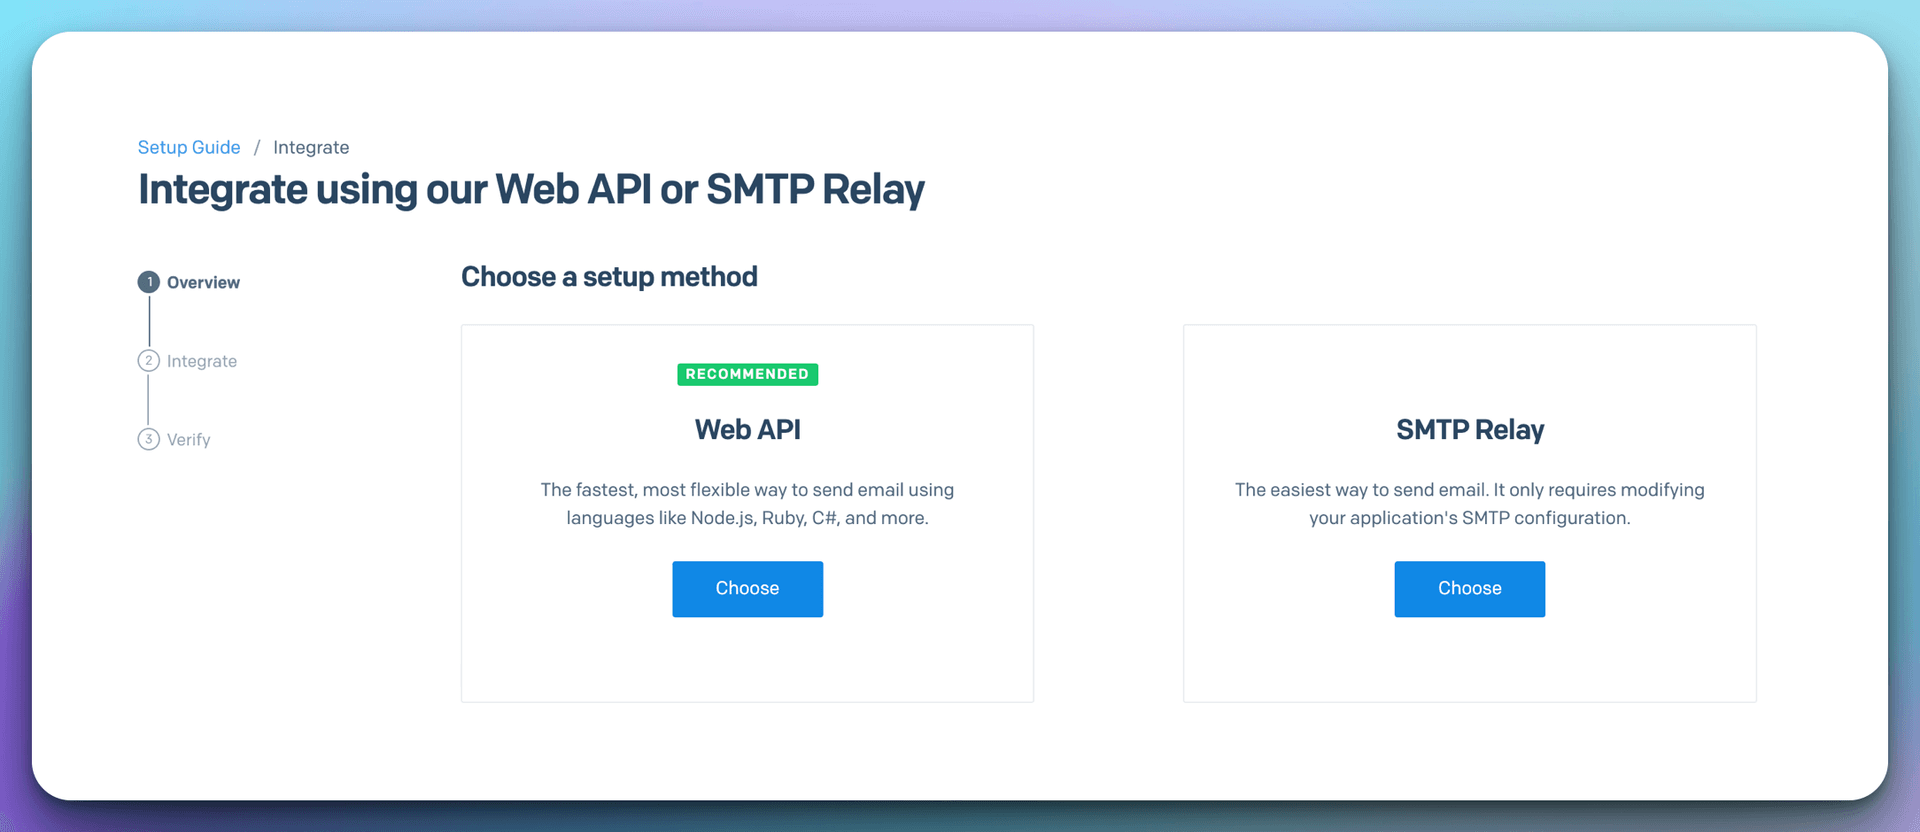
How can we set up the Firebase Trigger Email Extension?
Note that for the Firebase Trigger Email Extension to be installed, you will need to be on the Blaze plan. This is a pay-as-you-go payment option. But don't fret, in this case, the cost is subject to the volume of emails being sent.
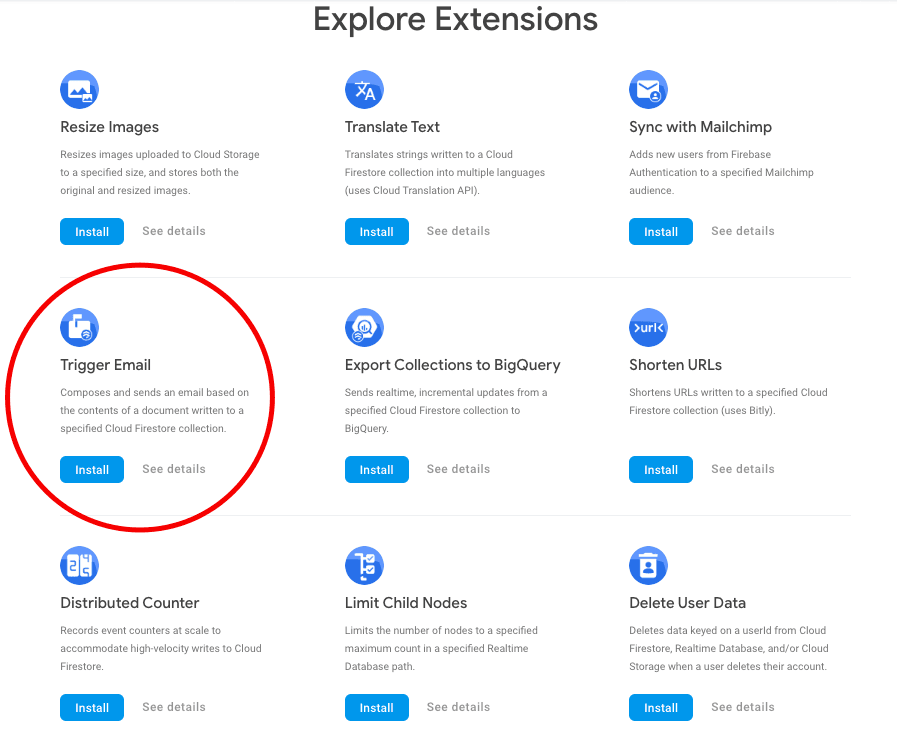
Once you set up the Blaze plan, search for Extensions within your project's Firebase Console.
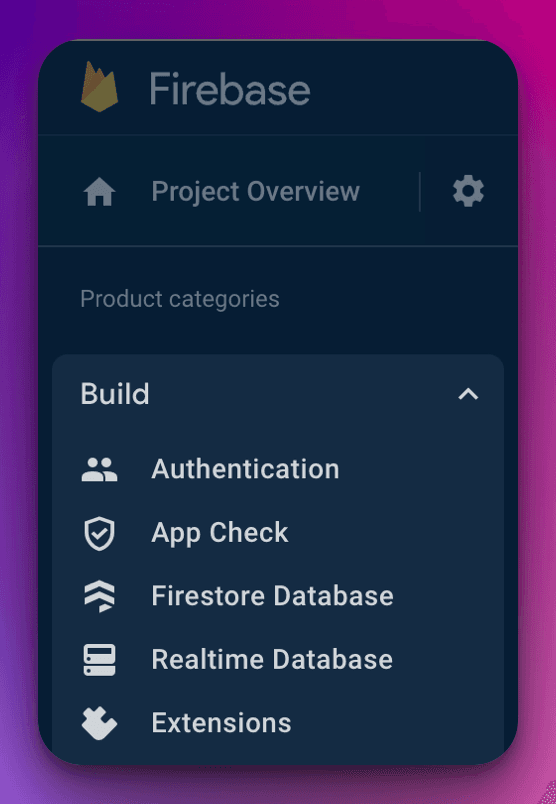
Find the Extensions option under the Build dropdown in the left column of the Firebase Console view.
Here you can view the impressive list of extensions Firebase has to offer. Once you find the Trigger Email Extension, install it!
After installation, open the extension to find a brief form that will require filling out. SendGrid, our SMTP provider will come in handy at this stage. Let's switch gears to SendGrid quickly and get the appropriate account created.
Sign up with the free tier and you'll land at the main dashboard. We now need to generate some credentials, so we refer to the left column and find Email API and Integration Guide as the subcategory.
After selecting the Integration Guide, we will be presented with two choices. Make sure to select SMTP Relay!
Next, we will see that we can generate an API Key. This is where we will get the credentials to provide to the Firebase Mail Extension.
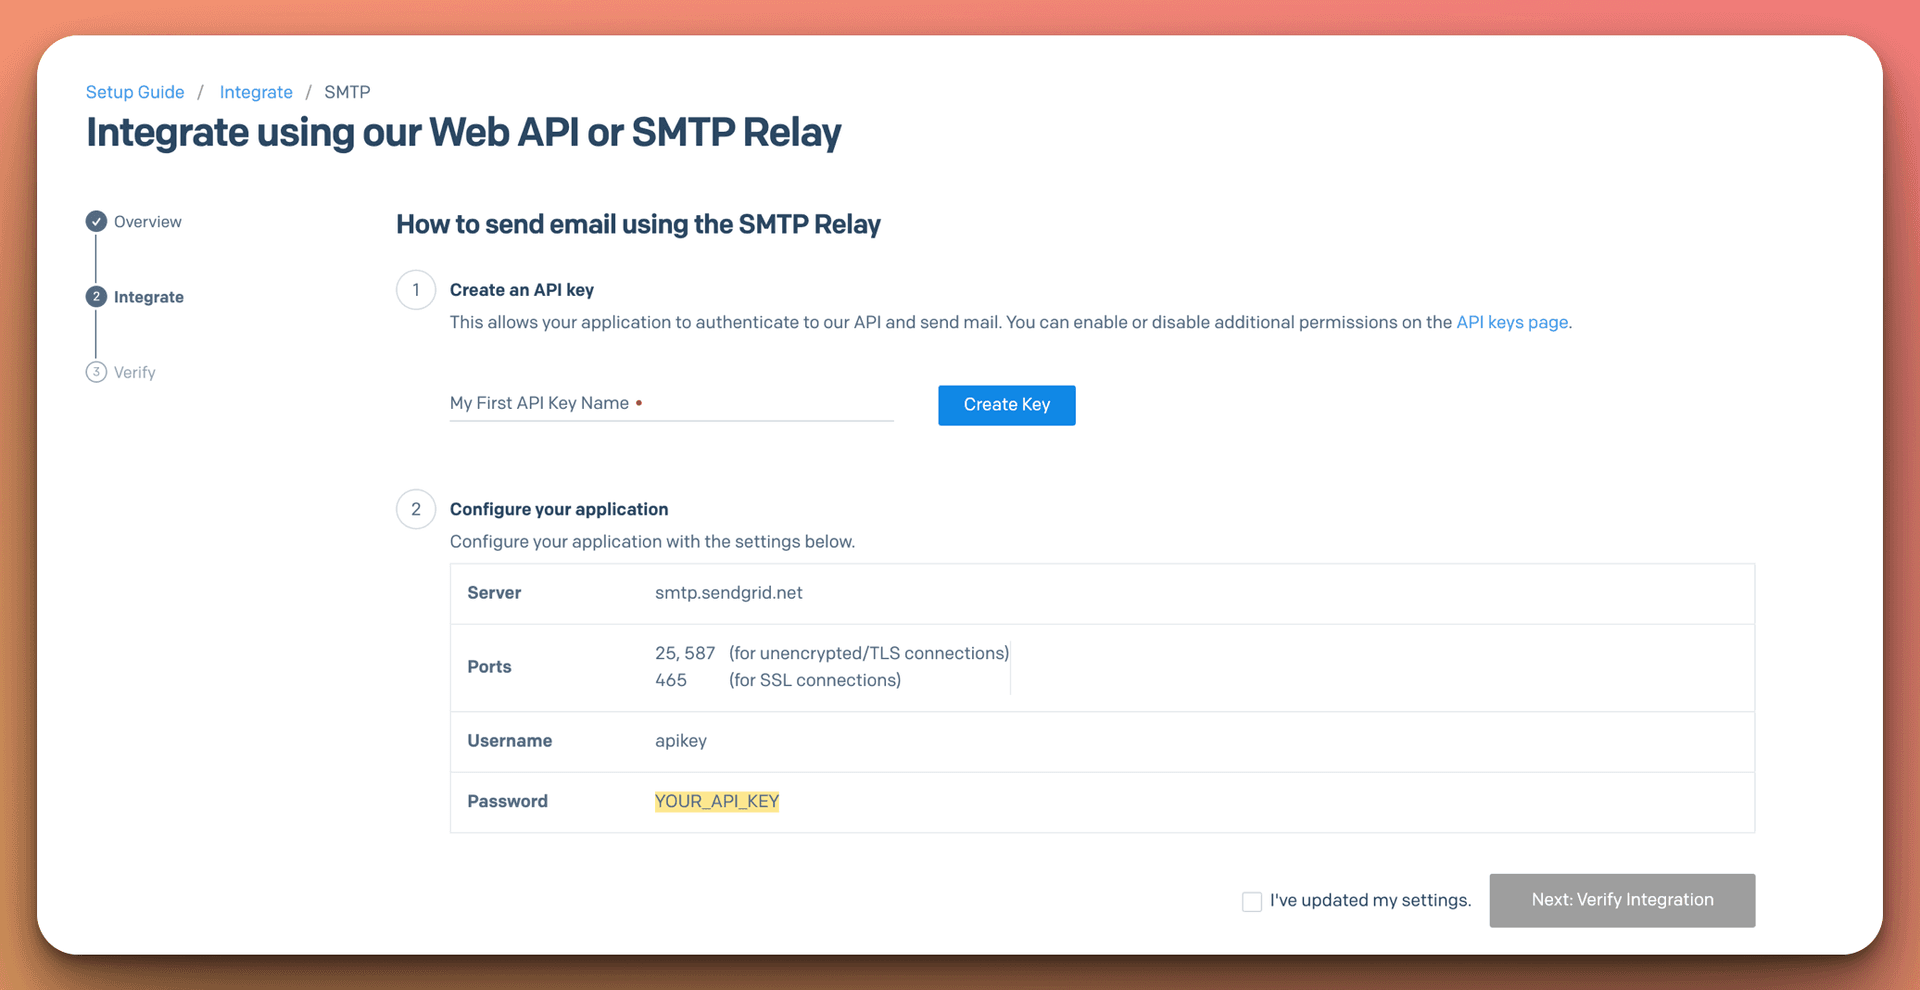
Generate your key, and you'll want to structure the SMTP Connection Uri for the Mail Extension like so:
smtps://apikey:YOUR_GENERATED_KEY@smtp.sendgrid.net:PORT_NUMBERNote that you aren't forced to make it secure, although note that because it's advised we are ensuring a secure connection for the sake of this example.
Make sure to provide the pieces to your Connection URI carefully. Make sure the parts are identical, add your keys with no whitespace and don't forget the PORT number! Getting the URI correct immediately will save you a lot of headache.
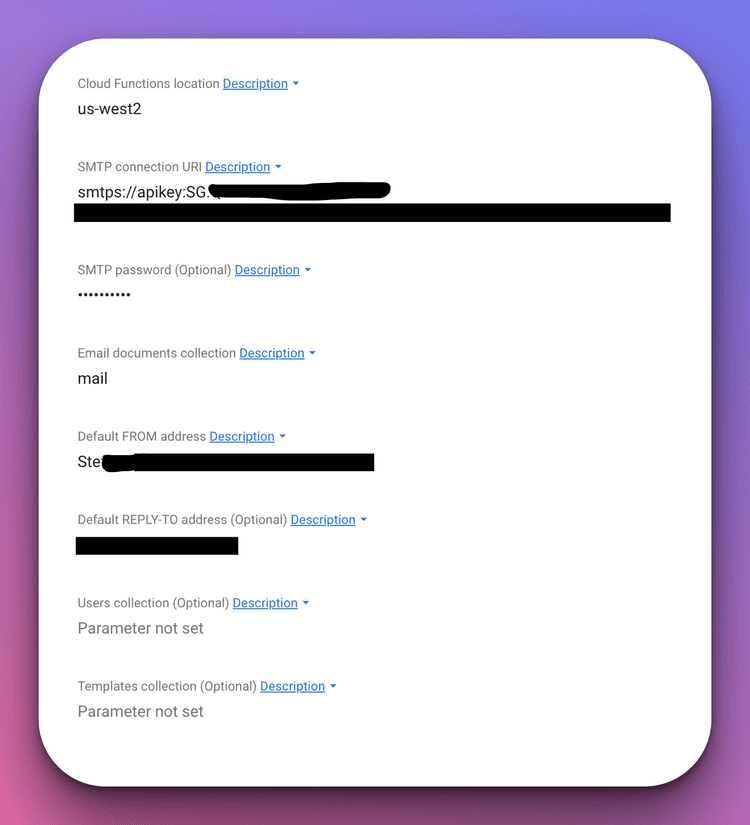
We are going to switch back to Firebase and provide this URI to the form.
Select the cloud function location closest to your targetted audience and provide your connection URI from SendGrid. The password is optional, but I provided mine. Name your collection that you want to add documents to trigger the email, in my case I kept the collection name consistent with the suggested "mail". Lastly, add who the email is coming from as well as optionally who will be receiving the email.
Once you save this configuration, the extension will take a few minutes to reflect these changes. After you see a notification that the extension is ready, we can create the collection we said would be responsible for storing the documents that trigger our mail.
In my case, I chose to name that collection "mail". As a result, I created a mail collection.
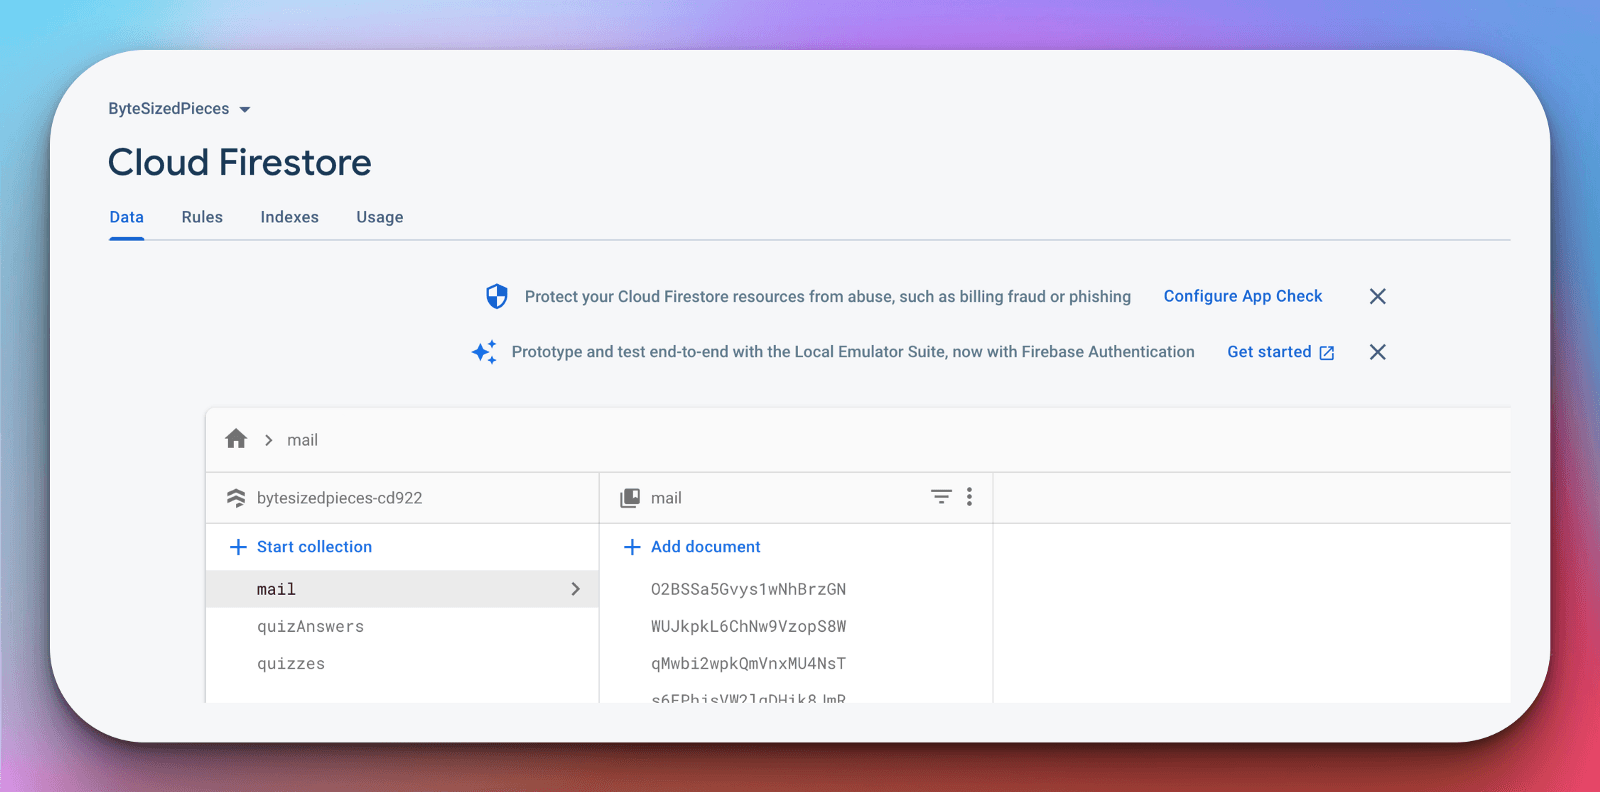
You can see by the attached image that I already have a few documents created within the "mail" collection. Insert a new document directly from the console, to test our recently added SMTP Connection URI.
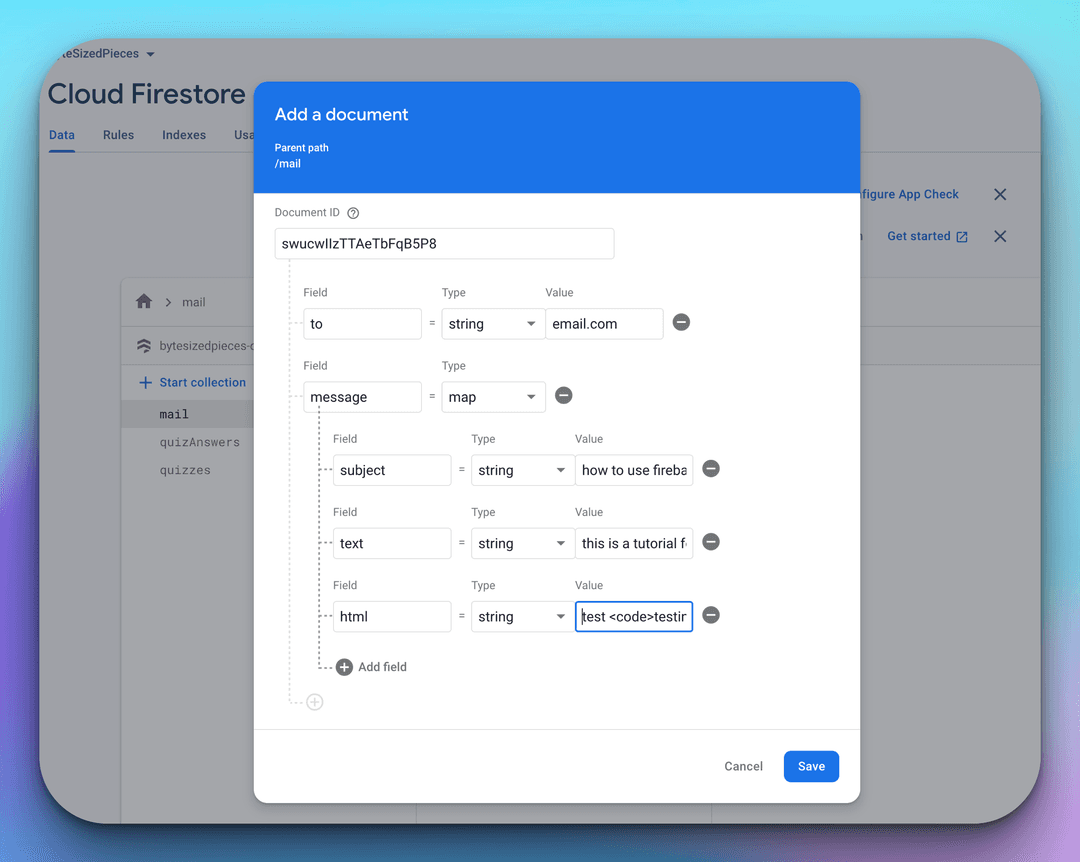
The above-attached document is just a subset of the fields we can supply for the email.
The top-level fields of the document supply the email sender and recipient information.
We have the following as available fields for the top level of the mail object:
- from: Sender's email address
- replyTo: Reply-to email address
- to: A single recipient email address or array with multiple recipient email addresses
- toUids: An array containing the recipient UIDs
- cc: A single recipient email address or an array containing multiple recipient email addresses
- ccUids: An array containing the CC recipient UIDs
- bcc: A single recipient email address or an array containing multiple recipient email addresses
- bccUids: An array containing the BCC recipient UIDs
- headers: An object of additional header fields
The message field can contain the following:
- messageId: A message ID header for the email
- subject: Subject for the email
- text: Plaintext content of the email
- html: HTML content of the email
- amp: AMP4EMAIL content of the email
- attachments: An array containing attachment(s). Nodemailer options supported: utf-8 string, custom content type, URL, encoded string, data URI, and pregenerated MIME node (be aware that your email has no access to the cloud server's file system)
With the creation of the document, we should see an immediate state update indicating the extension trigger.
As the Cloud Function runs, it will update the state until the process for sending the email is complete. We have five main states: RETRY, PENDING, PROCESSING, SUCCESS, and ERROR.
We should see PENDING, then PROCESSING while the payload is being sent to our SMTP service provider, SendGrid. The state then changes to SUCCESS or ERROR depending on the response.
If no response is received then we might see the state stall at PENDING or PROCESSING.
If it stays in this state for too long you can assume that the Connection URI you provided for the provider is faulty and need to check for typos. We can manually change the state to RETRY try resending the email again if we see an ERROR state with an error code that feels unrelated.
We can also monitor these state changes by adding a document snapshot listener client-side!
Bear in mind if we do see a SUCCESS status, technically the job for validation isn't done. The Firebase extension has seen a successful handoff to our SMTP provider, SendGrid! We need to refer to SendGrid to ensure our email has gone through to the expected recipient.
We can check this by going back to SendGrid and referring to our Activity Feed. From here we can see whether the emails were sent to the expected recipient or if they errored we can expand and examine the details!
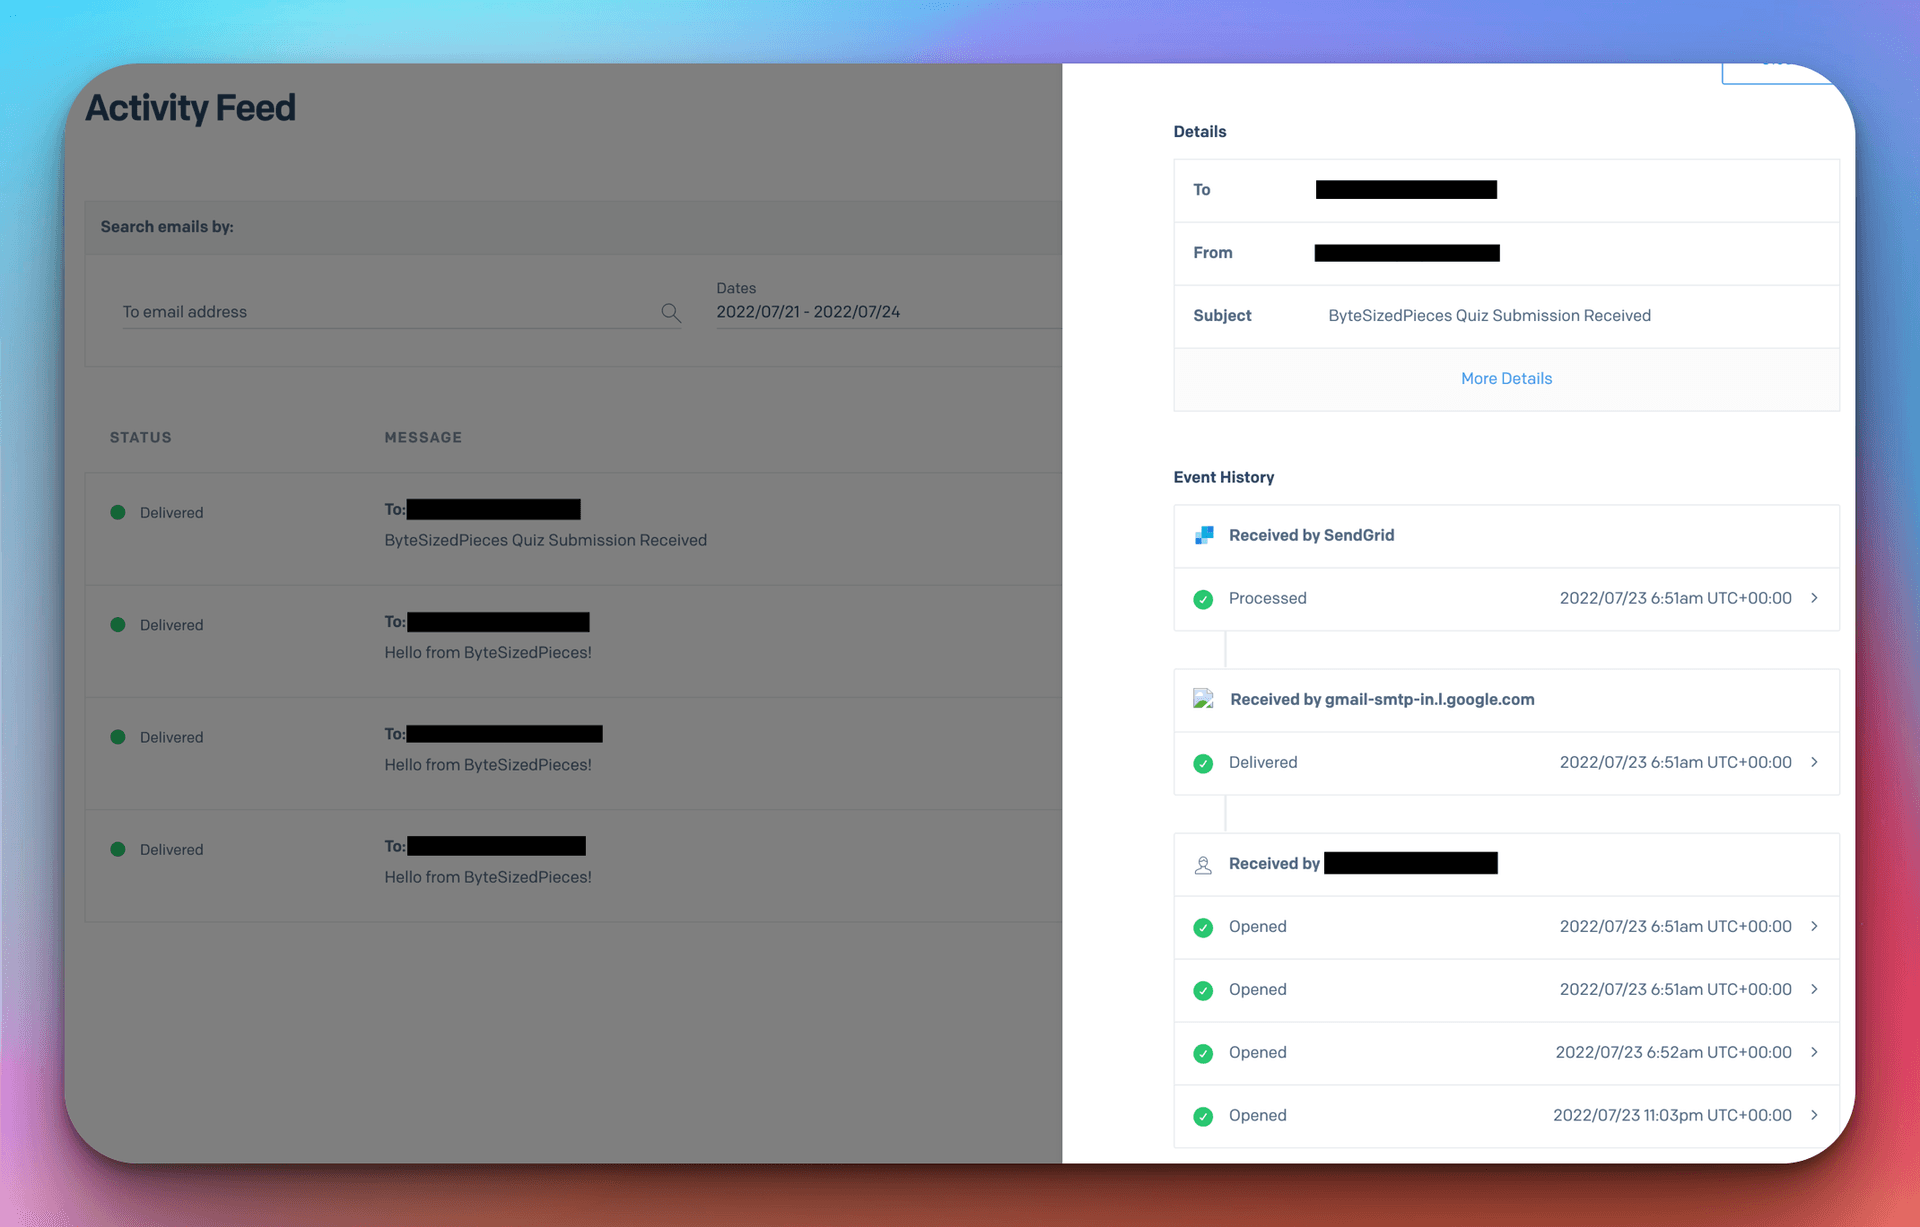
There we have it! We have tested whether our Trigger Mail Extension configuration can handle the important job of sending emails.
The last step is taking a brief look at how we can accomplish this with code. After all, we won't be manually inserting documents into Firebase to send our emails!
How we can programmatically trigger emails with the Firebase Trigger Email Extension
For Firebase engagements in my web app, I created a Singleton to handle generalized logic for document or collection retrieval, creations, and updates. This singleton makes it easy to get data from Cloud Firestore and make the updates I need while avoiding duplication of efforts.
Here is the supplied code for my FirebaseService Singleton. It's not perfect and needs better error handling but it will do for the sake of this example.
Take specific note of my added sendMail function.
import { firebaseDb } from '../configs/firebase';import {collection,getDoc,getDocs,addDoc,updateDoc,doc,serverTimestamp} from 'firebase/firestore';class FirebaseService {constructor () {this._db = firebaseDb;}getData = async (collectionId) => {const collectionRef = collection(this._db, collectionId);try {const data = await getDocs(collectionRef);return data.docs.map((doc) => {return {...doc.data(),id: doc.id};});} catch (e) {console.log(e);throw e;}}getDataById = async (collectionId, documentId) => {const docRef = doc(this._db, collectionId, documentId);try {const docSnap = await getDoc(docRef);if (docSnap.exists()) {return docSnap.data();} else {throw new Error('Document does not exist');}} catch (e) {console.log(e);}}// for now mail will automatically be configured to my emailsendMail = async (collectionPath, message = {}) => {try {await addDoc(this._getCollection(collectionPath), {to: process.env.BUSINESS_EMAIL,message});} catch (e) {console.log(e);throw new Error('Something went wrong with sending email. Error Message: ', e.message);}}// POST REQUEST HANDLINGupdateCollectionData = async (collectionPath, body = {}) => {try {await addDoc(this._getCollection(collectionPath), {...body,updatedAt: null,createdAt: serverTimestamp()});} catch (e) {console.log(e);throw new Error('Error updating collection data: Error Message: ', e.message);}}updateDocumentData = async (collectionPath, documentId, body = {}) => {try {const collectionRef = this._getCollection(collectionPath);await updateDoc(this._getDocument(collectionRef, documentId), {...body,createdAt: serverTimestamp()});} catch (e) {console.log(e);throw new Error('Error updating document data: Error Message: ', e.message);}}_getDocument = (collectionRef, documentId) => {if (collectionRef && documentId) {return doc(collectionRef, documentId);}throw new Error('collectionRef or documentId not provided');}_getCollection = (collectionPath) => {if (collectionPath) {return collection(this._db, collectionPath);}throw new Error('collectionPath or collectionId not provided');}}export default new FirebaseService();
For the sendMail function, I retrieve the Collection given any arbitrary path (in our case it was "mail"), then invoke addDoc with the to field predefined to my business email, and the sendMail invoker provides the message.
Now let's take a look at how we invoke sendMail.
I've written ByteSizedPieces using NextJS provided by Vercel. Therefore the upcoming sample code architecture you see is familiar to those with NextJS experience.
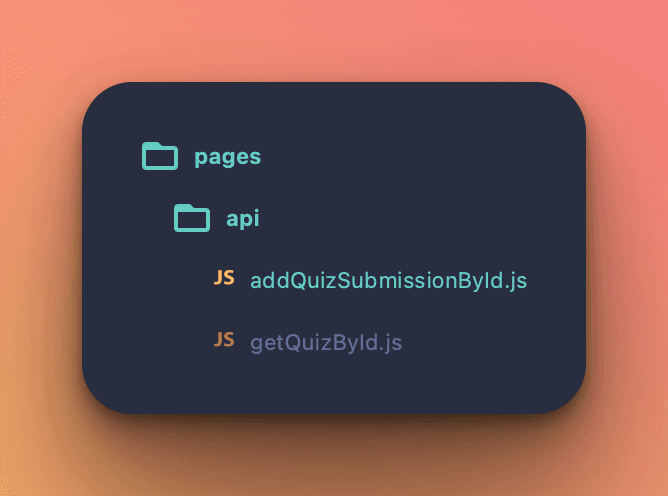
I created an API endpoint within path pages/api called addQuizSubmissionById. This endpoint will serve the purpose of adding the submission made by my readers. On success of adding the firebase document I trigger firebase to send me an email by adding a subsequent document to my mail collection.
import FirebaseService from '../../services/firebaseService';export default async (req = {}, res = {}) => {const { id: documentId, answer, quizIndex } = req.body;if (!documentId || !answer || !quizIndex) {res.status(400).json({ error: 'Id, quizIndex and answer for quiz are required' });}try {await FirebaseService.updateCollectionData(`quizAnswers/${documentId}/answers`, req.body);} catch (e) {res.status(500).json({ error: e.message || e.toString() });}// assume success with writing data now send emailtry {await FirebaseService.sendMail('mail', {subject: `ByteSizedPieces Quiz Submission Received`,text: `A new quiz submission has been made for ${documentId}. Option ${quizIndex} selected or answer ${answer} has been submitted.`,});res.status(200).end();} catch (e) {res.status(500).json({ error: e.message || e.toString() });}};
You can see I imported my FirebaseService singleton, check for the fields I need for the endpoint to be successful, and attempt to add the user submission to my quizAnswers collection. After submitting the answer to my Firebase collection, I then trigger sendEmail with the message payload containing the information from the user's quiz submission.
Recall here we can provide a lot more information for the message payload. In addition to what I've supplied, the payload can contain HTML for more aesthetic emails, attachments, send to a list of recipients, and more.
Just to bring the solution full circle, here is my addQuizSubmissionById being invoked by my blog's home page.
handleInformationSubmission = async (optionIndex) => {const { informationSeekerData = {} } = this.state;const { options = [] } = informationSeekerData;const quizResponse = await fetch('/api/addQuizSubmissionById', {body: JSON.stringify({id: 'home_tell_me_why_youre_here_prompt',quizIndex: optionIndex,answer: options[optionIndex]}),headers: { 'Content-Type': 'application/json' },method: 'POST'});// Check success/error here}
After I make a submission to my tell me why you're here form, I receive the following email!
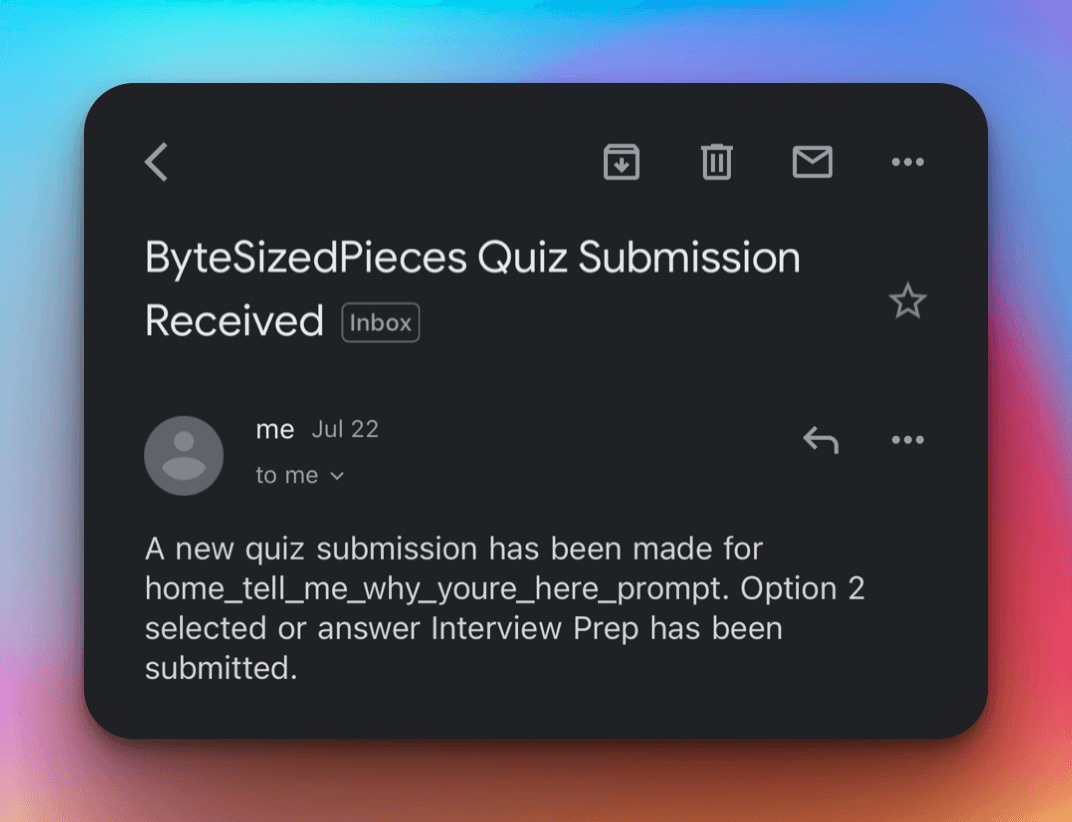
Victory!
Summary
- Firebase Trigger Email Extension reduces developer workload by allowing us to easily send emails just by adding a new document in a mail-specific collection
- Decide on your SMTP provider and be careful about providing the correct SMTP connection URI format!
- The emails we can send can be specific about recipients, header, subject, and content. Firebase Trigger Email Extension supports email templates for subject, text, HTML and AMP and attachments
- Use Firebase to test your Connection URI and follow through with your SMTP provider console for end-to-end testing of email delivery
- The email document will show state transitions for the payload sent to your SMTP server
- Write quick and easy code to handle the insertion of the mail-dedicated documents to the collection you've created
Now go out there and send automated emails to your heart's content with Firebase!
Remember, developers are creatures that turn coffee into code. So I'd very much appreciate if you bought me a coffee!  I’m a new writer and I will be posting very frequently on my findings and learnings in the tech industry and beyond. Join my newsletter if you would like to stay tuned!
Thanks for reading again! ❤️
| Understand Open Graph Dynamic Image Meta Tags | 1 |
| Pros and Cons of Caching Data in Software | 2 |
| How to build a Modal in ReactJS (Part One) | 3 |