

Metadata and meta tags are underestimated SEO optimization tools. Newer web developers may completely gloss over this powerful technique to improve the discoverability of the websites for which they are responsible. One might discover the lacking of meta tags in a website via tools like checkbot.io, or one might realize when they share a link to their website, an image doesn’t show up with the link on Twitter or Facebook like other websites! Why is that?

In this article, we will focus on a few critical concepts before diving into NextJS new open graph dynamic image updates. In order to truly grasp the incredible benefits of this released feature, we need to have a solid understanding of the following:
- Metadata meaning and meta tags
- Open graph protocol
- Shortcomings with the standard method of adding image meta tags
- Open graph dynamic images with NextJS
Metadata meaning and meta tags
To first understand why we care about the recent NextJS release, we need to have a background for the notion of metadata, what it means, and how meta tags fall under the metadata scope.

What is Metadata?
Generally speaking, metadata is defined as data that describes data. A more helpful way to understand metadata is by examining its application in specific areas. In this case, let’s understand metadata when applied to web development.
In web development, metadata consists of unseen HTML elements that serve the purpose of communicating and clarifying relevant website information for search engines like Google, ultimately making it a critical role in effective Search Engine Optimization.
Metadata still feels a bit abstract, and this is where meta tags come in to clear up the picture and give it a bit more structure.

Meta tags help us accomplish the goal of communicating and clarifying the relevant website information for our search engines. Meta tags are the actual snippets of text that describe a page’s content. They don’t appear on the page itself, but they are present in the page’s source code for crawlers to parse.
How do we create a meta tag on a website? Let’s examine an example of the usage of meta tags in ByteSizedPieces!
<Head><title>ByteSizedPieces blog posts about ReactJS web development</title><meta name="description" content="A web development blog focused on interview preparation, javascript, css, react, accessibility, web development tools, mobile development, and the tech industry." /></Head>
In the above example, we have a few details to make note of.
The
<head>element we have utilized serves as a container for our metadata and is placed between the<html>tag and the<body>tag. As such, any metadata should be positioned as children of theheadelement!The
metaelement is our meta tag! Note how we have some attributes, names, and content which tell the search engine crawlers that the meta tag is specifically intending to provide a description of our website, as well as the supplemental content which is the actual description.
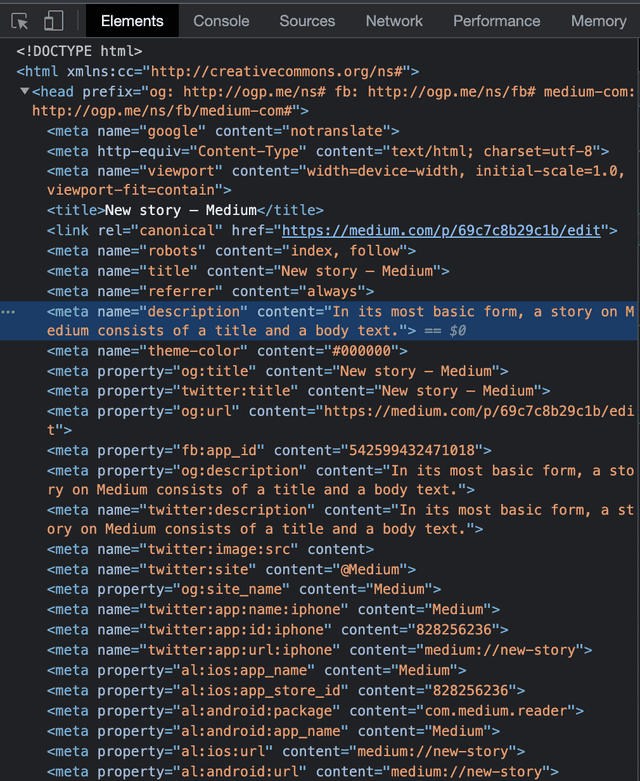
Looking at Medium, we can see many meta tags set within the head element! This explains why Medium does so well in the SEO space!
Open Graph Protocol
The open graph protocol is another metadata extension that gives websites a unique stance in the social graph. More specifically, whenever you share a URL on social media, Open Graph meta tags (OGP tags for short), inform what supplemental information comes with that URL. It could be the title, description, or in many cases an image.
On Twitter, a supplemental image influences engagement statistics by leaps and bounds. Retweets increased by 150%, clicks increased by 20%, and favorites increased by 90%.

The numbers do not lie, and images as metadata are important!
How do we typically communicate the image with the URL? Well, open graph is intended to be generalized across social media platforms. However, one needs to stay attentive to potential unique handling. Twitter Cards, for instance, look similar to Open Graph tags, but still deviate from the rulesets of OGP!
To avoid complications, we focus our attention on the general OGP conventions. To turn your own web page into a graph object, you would define a meta tag that follows the rulesets defined by the social media platform. For Facebook, the meta tag for an image would look like the following.
<meta property="og:image" content="" />
In conjunction with the importance of image metadata with shared URLs on social media, we should note the impact an aesthetic image makes versus one with low quality or visual relevance to the text.
This leads me to my final review topic prior to exploring NextJS OG Dynamic Image release.
Shortcomings with the standard method of adding image meta tags
We have established that images drive better conversion rates and the quality of images matters. The unfortunate fact is, with large blogs or e-commerce sites, a lot of effort goes into asset creation. The standard method of adding image meta tags requires individually creating images per page. This has proven to be inefficient and a waste of developer and designer time. If only things could be standardized!

In comes Vercel with their new amazing release for NextJS. Now we can see the beauty behind OG Dynamic Images.
Open graph dynamic images with NextJS
First we answer the following question.
What are Open Graph Dynamic Images?
Open graph or OG dynamic images enable social images to be generated on the fly per developer specification. These images can be configured to include dynamic properties, unlocking asset customization as well. Finally, the image generation runs on the vercel edge, to deliver rapid results based on user local, and is combined with caching for faster results.
Now that we understand what OG dynamic images are, let’s go over how we can create a new API for OGImage and leverage it in our website.
Before we begin, a gentle reminder that this feature is only available to projects that have been brought to version 13 of NextJS, and is still experimental.
Steps to leverage OG Dynamic Images
- Install @vercel/og npm package
- Create a new API for OGImage
- Use new API
Install vercel/og npm package
npm i --save @vercel/og
replace npm with yarn or pnpm as needed.
Create a new API for OG Image
First let’s decide what we are going to create.
Our asset is intended for to blog articles. When we share a link on social media to our blog post, ideally we would like to see an image with a background color, our blogs name, the title of the article and the category! OG Dynamic Images will come in handy here, as we will be able to set the dynamic properties for our images, and never have to look back!
Under pages/api/* we will want to create a new file og.js
Here we will import the ImageResponse object from @vercel/og . This object is responsible for processing our provided HTML and CSS, and convert that into an appropriate image which the endpoint will serve.
Recall the mention that this process is experimental, therefore we need to enable the experimental edge temporarily via:
export const config = {runtime: 'experimental-edge',};
Finally, let’s create a handler that takes in a request object, this process should be familiar to any NextJS endpoint.
Now our pages/api/og.js file should look like the following:
// pages/api/og.jsimport { ImageResponse } from '@vercel/og';// enable experimental edgeexport const config = {runtime: 'experimental-edge',};export default function handler(req: NextRequest) {}
Now we want to define some HTML and CSS and pass it to our imported ImageResponse object. For sake of simplicity, we will statically set filler text for the intended dynamic article title and category.
Below is the following rendering:

And below is how we did it via HTML and CSS passed to ImageResponse.
// pages/api/og.jsimport { ImageResponse } from '@vercel/og';// enable experimental edgeexport const config = {runtime: 'experimental-edge',};export default function handler(req: NextRequest) {return new ImageResponse(<divstyle={{backgroundColor: "#6800A3",backgroundSize: "100%",height: "100%",width: "100%",color: "#F9F9F9",display: 'flex'}}><divstyle={{padding: "20px",display: 'flex',flexDirection: 'column',alignItems: 'center',justifyContent: 'center',width: '100%'}}><h1style={{fontWeight: 900}}>ByteSizedPieces</h1><h2>Article title should go here</h2><div style={{'width': '100%',display: 'flex',justifyContent: 'center',alignItems: 'center',textAlign: 'center'}}><p style={{textAlign: 'center',backgroundColor: '#A341DB',borderRadius: '50px',padding: '5px 10px'}}>Category here</p></div></div></div>);}
If you want to play with this example, vercel offers an OG Image Playground. I have created a shareable playground here.
Now we get to the fun part, which are the dynamic traits to the generated image!
Our handler always receives a Request object as an argument. From the req we will obtain the url and retrieve provided searchParams .
searchParams are query params set when we use our endpoint via a meta tag. The query params can be dynamic or static depending on the developer. If this isn’t making too much sense, hang tight, when we use the endpoint we are creating it will click!
Let’s expect for now from our query params, a title and category field. We will set fallbacks should something unexpected happen and they are not set correctly.
Then we will just use those fields in our HTML and CSS passed to ImageResponse!
// pages/api/og.jsimport { ImageResponse } from '@vercel/og';// enable experimental edgeexport const config = {runtime: 'experimental-edge',};export default function handler(req: NextRequest) {// get searchParamsconst { searchParams } = new URL(req.url); const { title = 'New Article', category = '' } = searchParams;return new ImageResponse(<divstyle={{backgroundColor: "#6800A3",backgroundSize: "100%",height: "100%",width: "100%",color: "#F9F9F9"}}><divstyle={{padding: "20px"}}><h1style={{fontWeight: 900}}>ByteSizedPieces</h1><h2>{title}</h2><div style={{'width': '100%',display: 'flex',justifyContent: 'center'}}><p style={{width: '150px',backgroundColor: '#A341DB',borderRadius: '50px'}}>{category}</p></div></div></div>);}
Note that we adjusted the image to leverage the title and category variables now!
We have completed the first big part for OG Dynamic Images. The endpoint is set to expect two dynamic fields, a title and category, and will consume the provided HTML and CSS and return an image rendered with those fields.
You can test if the endpoint is working by visiting your running local instance of the app at https://localhost:3000/api/og?title=test&category=react
Note that in the test I have supplied the query params title and category. We observe an element that when inspected in the Developer Tools, reveals an img element. Neat!
Now the final detail comes to bring this full circle.
Use new API
Define a meta tag in the head for the page you would like the asset to display. For me that would be within pages/posts/[slug.js]
<Head><meta property="og:image"content=\`https://bytesizedpieces.com/api/og?title=${getPostShortTitle(frontMatter) || ''}&category=${getPostCategory(frontMatter)}\`/></Head>
A few details to note here that are very important for this to work.
You must specify the following attributes:
- property as
og:image - content with value set to the deployed instance for your app
Finally, check out how I provided the query params title and category to the value for the content attribute!
frontmatter is a representation of parsed YAML metadata each of my articles begin with. Thus I will achieve at each bytesizedpieces.com/posts/* route a dynamically generated asset at the edge, with built in caching!
Amazing!
Vercel is a no brainer. The improvements to NextJS are ever enticing. If you are interested in joining Vercel, try it out!
Custom Fonts in OG Dynamic Image
One final mention, note that the supplied image contains the Poppins typeface. If you would like to utilize a custom font, NextJS have accommodated this use case.
By making use of fetch you can supply a URL instance with the path to your custom fonts, and await the result in the handler. Refer to the following documentation to see how this is accomplished.
Testing
Test open graph images on Facebook, LinkedIn and Twitter separately, or take advantage of an open graph debugger.
- Facebook open graph Debugger.
- Twitter open graph Debugger.
- Linkedin open graph Debugger.
- All social media, open graph Debugger
- OG Dynamic Image Playground
Documentation to learn more
Remember, developers are creatures that turn coffee into code. So I'd very much appreciate if you bought me a coffee!  I will be posting very frequently on my findings and learnings in the tech industry and beyond. Join my newsletter if you would like to stay tuned!
Thanks for reading again! ❤️
| Pros and Cons of Caching Data in Software | 1 |
| How to build a Modal in ReactJS (Part One) | 2 |
| Email automation with Firebase Mail Extension and SendGrid | 3 |