

If you're reading this with the intent of custom building your own blog, I commend you! You're well on your way to freedom from the constraints of third-party tools.
I'll admit that it is overwhelming to get started with building your own blog. The complexity of a blog can be deceptive.
The distinction between a GOOD blog site versus a BAD one fall into the following categories.
Your blog needs to be:
- Flexible with adding new articles
- Easy to update
- Search Engine Optimized (SEO)
- Aesthetic while allowing your brand/personality to shine
- Fast!
Let's face it, you're not going to want to work on a blog that is clunky or difficult to add articles to. We want an easy-to-use website that is fully capable of generating much-needed traffic (that is the whole point of a blog, after all, to have readers)!
In this article, I'm going to break down how bytesizedpieces.com works to enable you to build something similar. Keep in mind, that this is a roadmap, not a tutorial. I will share the tools I use for bytesizedpieces.com as well as how I apply them to enable ease of content creation but flexibility for customization!
The Stack
NextJS
bytesizedpieces.com is built leveraging NextJS.
I've recently written an article about why I'm loving NextJS, and my blog was the first website I built using NextJS. I've gone into great detail in my article about why I personally love NextJS, if you wanted to read more about it check it out here. For my blog in particular, what mattered was my capability of choosing the page rendering by need. Next offers SSR (server-side rendering), SSG (static site generation), CSR (client-side rendering) by route, as opposed to forcing us to decide for the entirety of the application. This is powerful, and I wanted to leverage it for my blog given I initially wanted it to be an SSG but could see it becoming SSR based.
I also leverage Next's API Routes and use Firebase for my database, to store details like views per post or quizzes.
Vercel
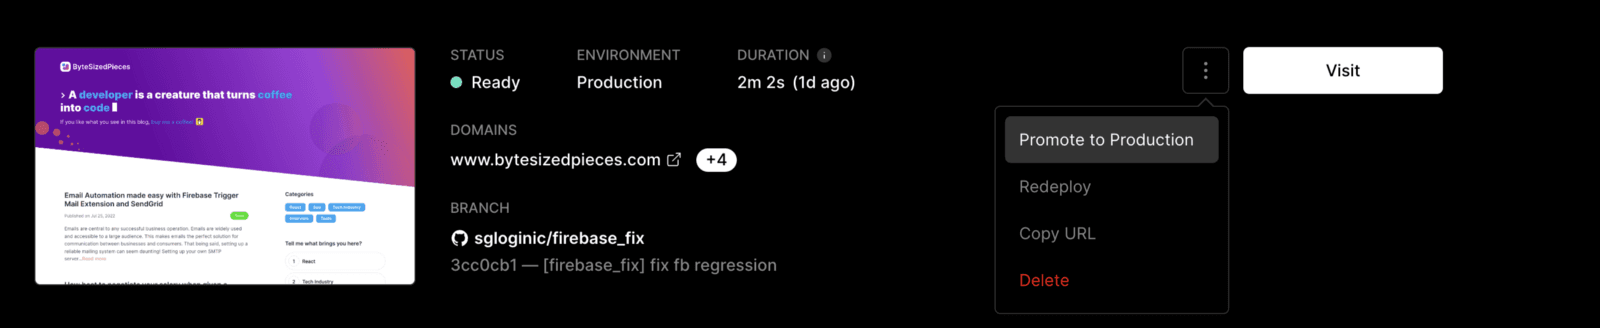
Vercel is the creator of NextJS. On top of being the creator of an awesome framework like NextJS, Vercel handles application deployments as well as the hosting of the bytesizedpieces.com domain I bought off of Google Domains. I bought into Google Workspaces so I can have an email with my custom bytesizedpieces.com domain. I personally believe having a business email is necessary for true professionalism. This is why I made the call to buy the starter package for Google Workspaces and leveraged that business email for all automated emails related to bytesizedpieces.Now let's examine the Vercel application deployment capability. I am not particularly skilled in handling deployments, but Vercel is so incredibly easy to use it's a no-brainer for me now. Whenever I create a PR, a "staging" deployment automatically triggers with Vercel. I see this deployment on display in my PR with a link to review the deployment stages as well as preview the app with my changes. When I feel like my changes are ready, I go ahead and promote them to production and merge my PR!
Vercel quickly became infinitely more impressive when I saw the level of detail I can get into for details like environment variables. I always am personally paranoid about my environment variables. I fear the exposure of API keys or secrets. I also worry about managing these fragile fields among the different hosts(dev, staging, production).
Vercel makes the environment variable management concern a thing of the past!
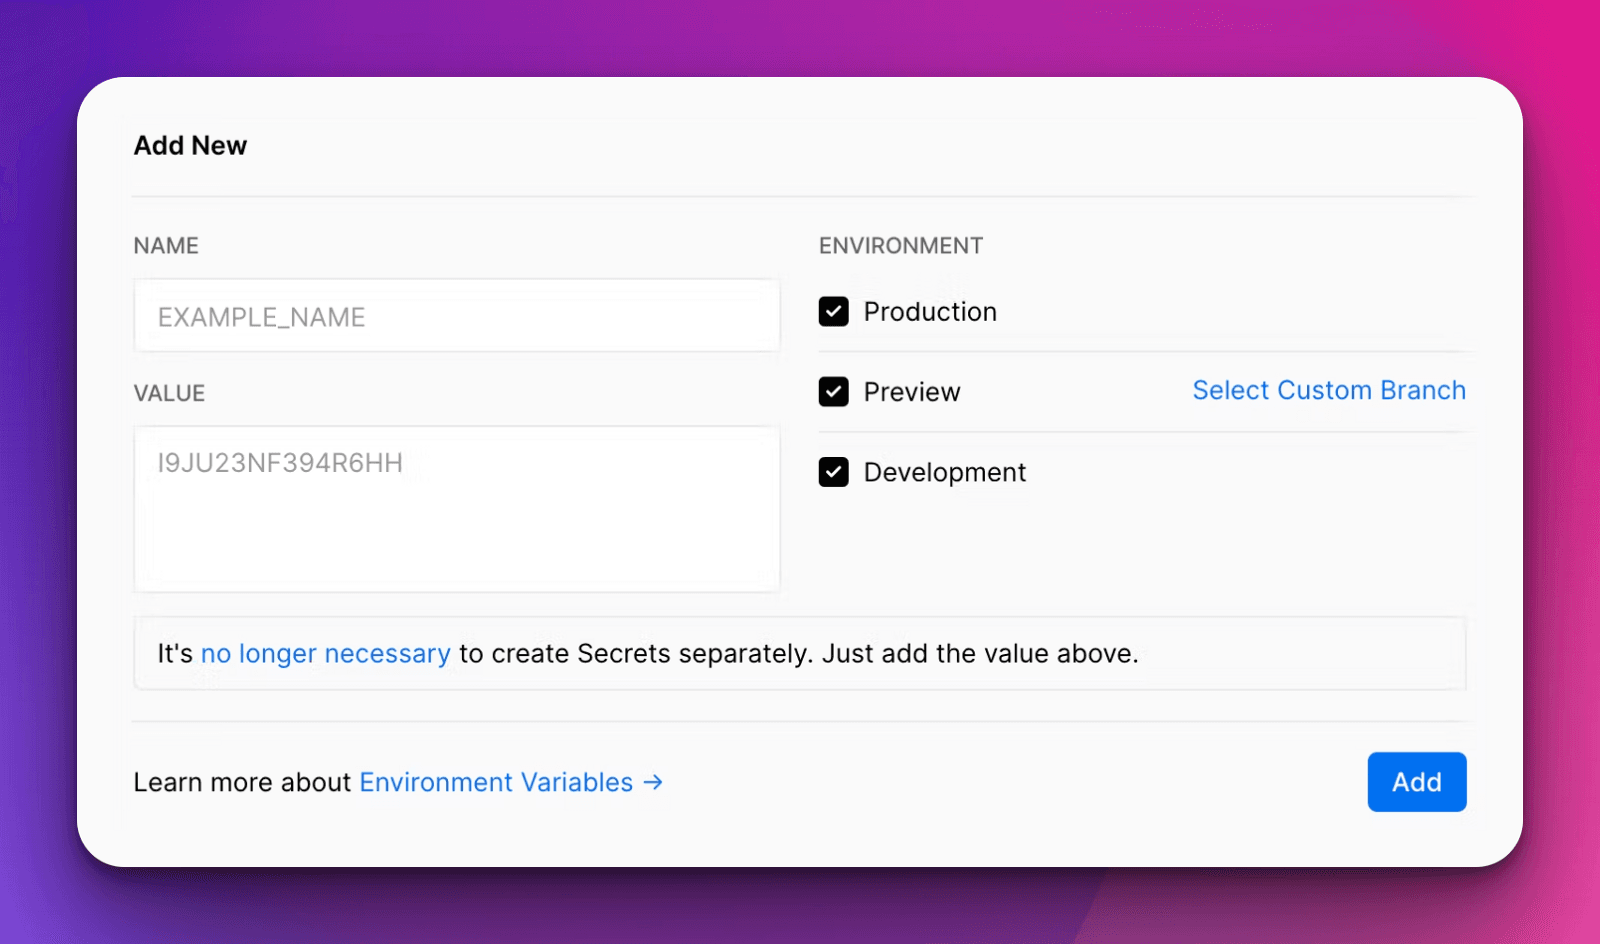
You can see we add the name of the environment variable, and the value, and select the applicable environments for the variable. Done and done!
And hosting? I had my website hosted at bytesizedpieces.com, in production, within 10 minutes. Amazing!
Vercel is a no brainer. If you are interested in joining Vercel, try it out!
MDX
Now let's talk about the technology I use for the web application itself. MDX is one of the critical packages that are the backbone of bytesizedpieces.com. It allows me to write my posts out in Markdown, but that is not what makes MDX a winner. MDX is special because it enables me to integrate custom components in my markdown.
MDX allows usage of JSX in markdown content, which empowers us to add our unique flair and personality to our blogs, which would otherwise be much more complicated to achieve!
This was one big pet peeve of mine when working with third parties for my blogging. There's only so much you can customize your blog to make it represent YOU when you're on Medium, dev.to, substack, what have you. When I decided to build my own, I had to allow customization as much as possible. This is why MDX was a no-brainer to me.
Enough talk, let's look at some examples, shall we?
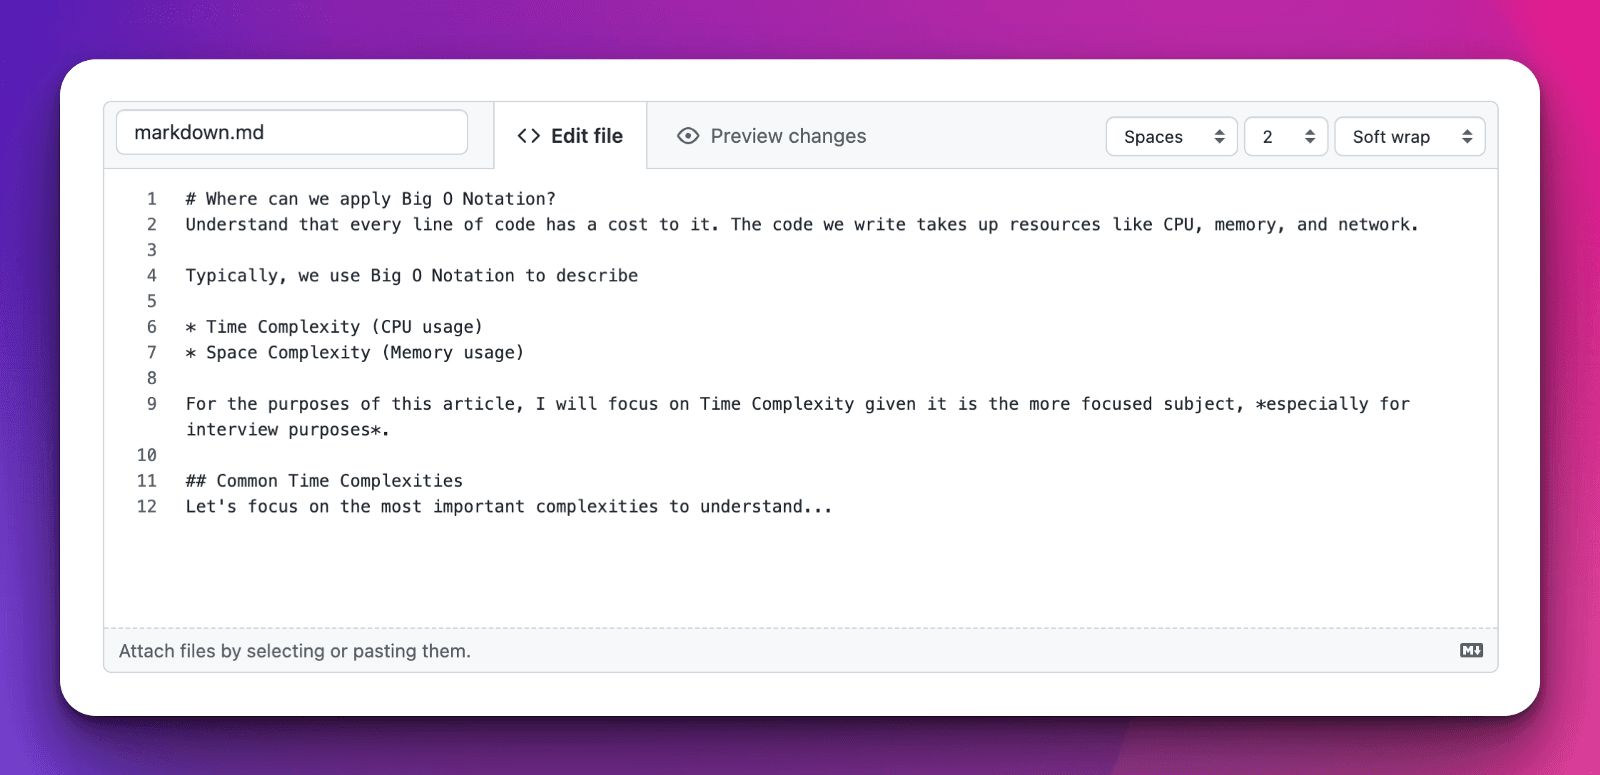
First, here's some standard markdown.
When applied it looks like the following:

Markdown is a markup language that formats elements to plaintext text documents.
You can see here that a hash is some form of a header, asterisk * creates bullet points, wrapping text with asterisks italicizes the text and so on. There are many markdown rules, but we won't cover all of them in this particular post. I hope however, it's clear of the benefits markdown syntax offers for a blog. Markdown syntax is easy to use and applicable to the format blog posts tend to have.
The asterisks get transformed at compilation into a <strong> element, the list gets turned into <ul> and each sentence automatically gets assigned a <p> tag.
This is great, but I expect something more than just a handful of HTML elements in my blog.
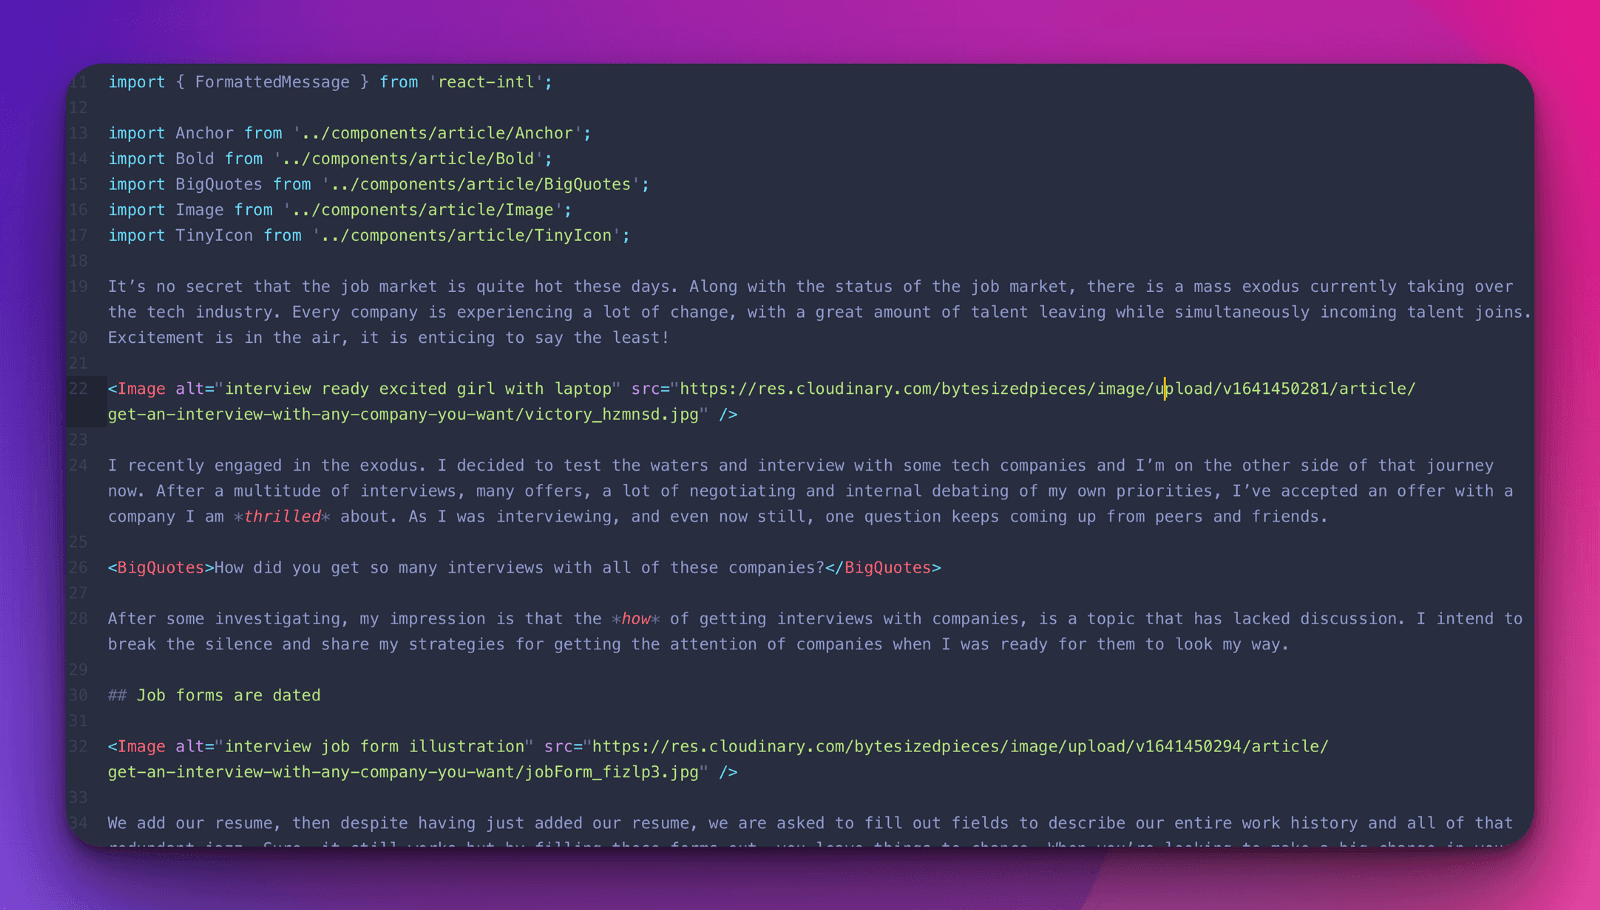
Here is how MDX adds a fantastic flare to standard markdown. Observe how I import my own custom components. Focus on the BigQuotes custom component and look how I easily use it among the markdown!
Here is how that ends up looking on bytesizedpieces.com

I can add unique components to mix things up a bit, as well as means for my audience to engage with my posts through quizzes. I can even animate text! MDX allows us to go crazy creative. Anything you can do on the web, you can easily have in your articles at no extra cost thanks to MDX!
Now we get to the how for integration.
MDX with NextJS
A few ways how to set up MDX with NextJS
- @next/mdx
- Hashicorp's next-mdx-enhanced
- Hashicorp's next-mdx-remote
- Kent C Dodds' mdx-bundler
I have personally incorporated MDX into NextJS using next-mdx-remote.
next-mdx-remote allows me to load MDX files within getStaticProps or getServerSideProps for client hydration.
The code looks something like the following, I've omitted some irrelevant parts to stick to the point.
// Dependenciesimport React from 'react';import fs from 'fs';import matter from 'gray-matter';import { withRouter } from 'next/router';import { FormattedMessage } from 'react-intl';import { MDXRemote } from 'next-mdx-remote';import { serialize } from 'next-mdx-remote/serialize';import path from 'path';// Selectorsimport { getPostTitle } from '../../selectors/post';// Utilsimport { getMDXFileName, postFilePaths, POSTS_PATH } from '../../utils/mdxUtils';// Components// ...export default class PostPage extends React.Component {// ...render () {const { frontMatter = {}, source = {}, slug } = this.props;return (<ArticleTemplate data={frontMatter} slug={slug}><MDXRemote {...source} components={components} /></ArticleTemplate>);}}export const getStaticProps = async ({ params = {} }) => {const postFilePath = path.join(POSTS_PATH, `${params.slug}.mdx`);const source = fs.readFileSync(postFilePath);const { content, data } = matter(source);const mdxSource = await serialize(content, {// Optionally pass remark/rehype pluginsmdxOptions: {remarkPlugins: [],rehypePlugins: [],},scope: data,});return ({props: {source: mdxSource,frontMatter: data,slug: params.slug}});}export const getStaticPaths = async () => {const paths = postFilePaths.map( // Remove file extensions for page paths(path) => getMDXFileName(path)).map( // Map the path into the static paths object required by Next.js(slug) => ({ params: { slug } }));return ({paths,fallback: false});}
The key takeaways for the provided code are as follows.
I make use of…
- getStaticPaths to define how NextJS is to populate [slug] for my dynamic routing (slug is set as each of the individual static files I store under a src/templates folder)
- getStaticProps which enables static site generation (SSG) with NextJS to define the static props I need to provide to my parent component (PostPage)
- serialize from Hashicorp's next-mdx-remote (intended to be run server-side which applies for SSGs) which will consume my MDX file as a string and return something that MDXRemote can effectively use
- gray-matter which parses the MDX files I statically retrieve for the metadata I define at the top of the files
- MDXRemote from Hashicorp's next-mdx-remote is the final piece to absorb the list of components that are required to render my articles as well as the source from the serialization performed in getStaticProps
Next, you'll see that I've created a parent ArticleTemplate component. This helps me automatically format each article with the same layout. ArticleTemplate sets up my article headers using the gray matter parsed metadata per article and view counts. It handles adding the engageable circular buttons in the leftmost column and targets header components to generate my clickable table of contents list showing in the rightmost column. ArticleTemplate keeps track of scroll location, for now just highlighting the currently examined section (using header location as a point of reference). Finally, ArticleTemplate renders the MDX child content!
This isn't a tutorial article for MDX, but perhaps I will write one in the near future. In the meantime, these are the articles that helped me gain clarity and get started if your interest has peaked!
Resources to get started with MDX and NextJS
Metadata
Let's talk about how I provide metadata to my article template component.
Bear in mind, in the beginning, I didn't want to involve any databases in my blog. I wanted bytesizedpieces to be static. Therefore I needed to figure out a way to supply metadata and frontmatter is the answer!
Frontmatter allows us to add separators -- like so with the data we want to supply via YAML, where YAML is a human-readable data-serialization language.
At the top of every article on bytesizedpieces.com, you'll see:
---title: Analyze Big O' Notation and save your valuable reputationshortTitle: Analyze Big O' Notationabstract: >-Big O Notation understanding is just one of those things a Software Developer has to have in their toolkit. Big O Notation starts off easy and can feel understandable, then BAM the complexity comes in and it leaves you reeling. Let's do a dive into Big O Notation, and discuss howdescription: >-Article summarizing Big O Notation importance for software engineering interviews. Covers constant time complexity, linear time complexity, logarithmic time complexity, and quadratic time complexity.publishedOn: 'Tue Jul 05 2022 09:09:18 GMT-0700 (Pacific Daylight Time)'updatedOn: 'Wed Mar 22 2023 13:15:58 GMT-0700 (Pacific Daylight Time)'category: INTERVIEWcategoryColor: secondary---
I use the gray-matter package to help me parse this metadata and isolate it into content versus front-matter data.
To elucidate on some of these fields, the category and categoryColor are used to indicate which categories section the article should fall under. The publishedOn date is updated on the day of release (the exact time doesn't matter as much to me, this can be improved in the future). updatedOn is null unless my article gets updated, then I supply another date from the day it is updated. The abstract is for my post previews, lastly the description and shortTitle for now, are applied in tags for SEO purposes.
ThemeUI
At the time of making my blog, I had first heard of ThemeUI and was intrigued to use it. I was looking for something that supports functional CSS, but with ThemeUI saw several more improvements to styling that intrigued me to give it a try. I do not regret my choice so far!
So without further mystery, let's talk about why I was interested in ThemeUI.
- Functional CSS through sx prop
- Group style guidelines via variant
- Theme common designs
- Responsive handling
A common issue I have noticed throughout my career as a FrontEnd engineer is the difficulty with generalizing styling with the design teams and engineers. ThemeUI is tackling that problem, by enabling us to create a theme configuration that our components can use and reuse. This enables design teams and engineers to synchronize their efforts, as opposed to clash.
ThemeUI unlocks style guide-driven development.
The sx prop enables us to add inline styles to components using CSS properties in addition to fields from our theme object.
We are able to apply this sx prop inline to our elements. I strongly prefer seeing styles directly in my components, as it presents the full picture in one and helps reduce the chance of redundant styles that would result in shipping unnecessary CSS pollution.
I used to work at Yahoo, therefore I come from an Atomic CSS (CSS in js) background (given Yahoo was the creator for it). The CSS-in-JS approach has its benefits and downsides that are well examined here, we can see why solutions like ThemeUI or Tailwind have improved on Atomic CSS and I am here for it! ThemeUI is built on top of Emotion, another well-loved CSS library.
Back to ThemeUI!
Here is a sample of my theme configuration for my buttons.
export default {// ...button: {types: {primary: '',secondaryOutline: {border: `2px solid ${COLORS.secondary.color}`,color: COLORS.secondary.color,borderRadius: '8px','&:hover': {backgroundColor: COLORS.secondary.color,color: COLORS.white.color}},disabled: {variant: 'colors.white',backgroundColor: COLORS.gray.color,borderRadius: '8px'},secondary: {variant: 'colors.white',backgroundColor: COLORS.secondary.color,borderRadius: '8px','&:hover': {backgroundColor: COLORS.darkPurple.color}},whitesecondary: {variant: 'colors.primary',backgroundColor: COLORS.white.color,borderRadius: '8px'},primarylighttext: {variant: 'colors.white'},primarydarktext: {variant: 'colors.black'},circle: {borderRadius: '50%',backgroundColor: COLORS.white.color,cursor: 'pointer','&:hover': {backgroundColor: COLORS.primary.color}},styleless: {backgroundColor: 'transparent',padding: '0px',margin: '0px'}}},//...}
You can see here I have quite a few buttons I use. Let's focus on one of these, why not secondary? I use this button theme in many areas of bytesizedpieces.com. My category buttons, newsletter buttons, and quiz/form submission buttons all reuse this theme.
Here is how I use the secondary theme along with other custom styles.
/** @jsxImportSource theme-ui */import { Button } from 'theme-ui';// ...export class CategoryButton extends React.PureComponent {render() {const { category = {} } = this.props;const { labelId } = category;return (<Button variant="button.types.secondary" sx={{'padding': '0px', 'cursor': 'pointer'}}><div sx={{'variant': 'button.sizes.small','boxSizing': 'border-box','whiteSpace': 'nowrap'}}><FormattedMessage id={labelId} /></div></Button>);}}
Notice I imported a Button component from the theme-ui library. These components can directly take a variant so we do not have to specify if in the sx object. I add a few more added styles that are unique CategoryButton such as making it with no padding and having a pointer as the cursor.
Below that you can see how I still applied sx to the div, and can still provide a variant, in which case I chose from the button.sizes configuration.
Everything on bytesizedpieces.com is theme configured where it can be. And it's made my FrontEnd developer life much easier.
Because it can never all be positive, I will call out one downside I've noticed with ThemeUI.
- You can only use one variant specification
Ideally, I'd like to combine some of my theming configurations. As of now, I've found good enough workarounds to live with this downside.
Some resources on ThemeUI:
React-Intl
Usage of react-intl definitely comes from the point of bias from past work experience. I loathe hardcoding messaging into my components. Formatting is yet another underestimated challenge that tends to sneak up on FrontEnd developers.
Hardcoding messaging in components
- Doesn't scale well
- Is not reusable
- Is not maintainable
- Is not good for internationalization/globalization
- Not good for formatting (will likely need to import large packages like FormatJS anyways)
Maybe you're seeing a trend in my approach at this point. I am a believer in configs in FrontEnd web applications.
Here is a short list of what I find configs help with.
- Consistency
- Maintainance
- Reusability
- Abstraction/Modularization
- Scalability
How did I use react-intl to solve the problems with messaging organization and formatting?
Here is my strings.js config.
export default {'BYTESIZEDPIECES': 'ByteSizedPieces','BYTE_SIZED_PIECES': 'bytesizedpieces','COLUMN_2': 'I contain other information','PIECES': 'Pieces','SEO': 'Seo','BITS': 'Bits','ABOUT': 'About','MAIN_QUOTE': '{caret} A {emphasisOne} is a creature that turns {emphasisTwo} into {emphasisThree}','SUBTEXT_QUOTE': 'If you like what you see in this blog, {link}','BUY_ME_A_COFFEE': 'buy me a coffee!','DEVELOPER': 'developer','COFFEE': 'coffee','CODE': 'code','INTERVIEW': 'Interview','TOOLS': 'Tools','UPDATED_ON_X': 'Updated on {date}','PUBLISHED_ON_X': 'Published on {date}','ELLIPSES': '...','READ_MORE': 'Read more','X_VIEWS': '{viewCount} {viewCount, plural, one {view} other {views}}','REACT': 'React','CSS': 'Css','MENTAL_HEALTH': 'Mental Health','TECH_INDUSTRY': 'Tech Industry','JAVASCRIPT': 'Javascript','CATEGORIES': 'Categories','VISITING_PROMPT': 'Tell me what brings you here?','TABLE_OF_CONTENTS': 'Table of Contents','THANKS_FOR_YOUR_SUBMISSION': 'Thanks for your submission!',// Article Related Content'CREATED_BY_CHRIS': 'Graphics created by {authorLink}','CHRIS_DOE': 'Chris Doe','MODAL_AS_CHILD_OF_APPROOT': 'Modal showing up as child of div with id appRoot','HIERARCHY_WITH_MODAL': 'Hierarchy With Modal','O_N2_TIME_COMPLEXITY': 'O(n²) time complexity','OMN_TIME_COMPLEXITY': 'O(mn) time complexity','BIG_O_COMPLEXITIES_NUMBER_OF_COMPUTE_BY_N': 'Big O Complexities with Number of Computations by n','TIME_COMPLEXITIES_GRAPH': 'Common time complexities represented in a graph','ARRAY_FN_WITH_O_N_TC': 'Array Printing function with O(n) time complexity','CONFIDENCE': 'Confidence','PRACTICE': 'Practice','RESEARCH_ON_TABLE': 'Research on Table','SKILLS_CHECKLIST_PER_CANDIDATE': 'Skills Checklist Per Candidate','SALARY_NEGOTIATIONS': 'Salary Negotiations','EMAIL_SENDING': 'Email Sending','FIREBASE_TRIGGER_EMAIL_EXTENSION': 'Firebase Trigger Email Extension','TWITTER_POLL_FOR_BLOG_FEATURE_SET': 'Twitter Poll for Blog Feature Set'};
After defining this config, I wrap my App with an IntlProvider and supply the config as well as the locale (in my case, en for English).
This is how that looks:
// Dependenciesimport * as React from 'react';import NextApp from 'next/app';import { IntlProvider } from 'react-intl';// Configsimport strings from '../configs/strings';export default class MyApp extends NextApp {render() {const { Component, pageProps } = this.props;return (<IntlProvider messages={strings} locale="en"><Component {...pageProps} /></IntlProvider>);}}
Finally, we will examine how I use react-intl throughout all of bytesizedpieces.com. Remember the sample code of Categories from earlier?
/** @jsxImportSource theme-ui */import { Button } from 'theme-ui';// ...export class CategoryButton extends React.PureComponent {render() {const { category = {} } = this.props;const { labelId } = category;return (<Button variant="button.types.secondary" sx={{'padding': '0px', 'cursor': 'pointer'}}><div sx={{'variant': 'button.sizes.small','boxSizing': 'border-box','whiteSpace': 'nowrap'}}><FormattedMessage id={labelId} /></div></Button>);}}
Notice the usage FormattedMessage here. This is one of react-intl's components that consume a key that is stored in my strings.js configuration.
Take a look at SUBTEXT_QUOTE from my strings.js. You'll notice I have what looks like a token in the string indicated via the curly braces.
If you like what you see in this blog, {link}.
I can populate link in FormattedMessage by providing an object values as a prop.
Check out how I did that:
<FormattedMessage id="SUBTEXT_QUOTE" values={{link: (<a onClick={this.onBuyCoffeeClick} href={links.buyMeACoffee} sx={{'display': 'flex','alignItems': 'center','flexWrap': ['wrap', null, null]}}> <span sx={{ 'variant': EMPHASIS_THEME }}><FormattedMessage id="BUY_ME_A_COFFEE" /></span><Image alt="buy me a coffee icon"sx={{'width': ['15px', '18px', '24px'],'marginLeft': ['4px', '4px', '8px']}}src={images.buyMeACoffee}/></a>)}} />
I can specify the link as a key in values, and my value is an anchor in this case wrapping more elements.
This is the final result of that logic.

In addition to FormattedMessage we have FormattedNumber (I've used this for formatting currency) and FormattedDate.
I can handle plurals in the strings config like so.
'X_VIEWS': '{viewCount} {viewCount, plural, one {view} other {views}}'
X_VIEWS expects to take in a viewCount, where when viewCount amounts to one, the string would be view and if the count is anything other than one, the string would be texts.
These are just a few of the many reasons I choose to use react-intl in my applications, and why I chose to use it again for bytesizedpieces!
Firebase
The last piece that makes up a majority of bytesizedpieces that warrants mentioning is Firebase! Initially, bytesizedpieces was a purely static site. But a second round of development left me wanting more engagement with my viewers.
I decided to add a questionnaire, like the following.
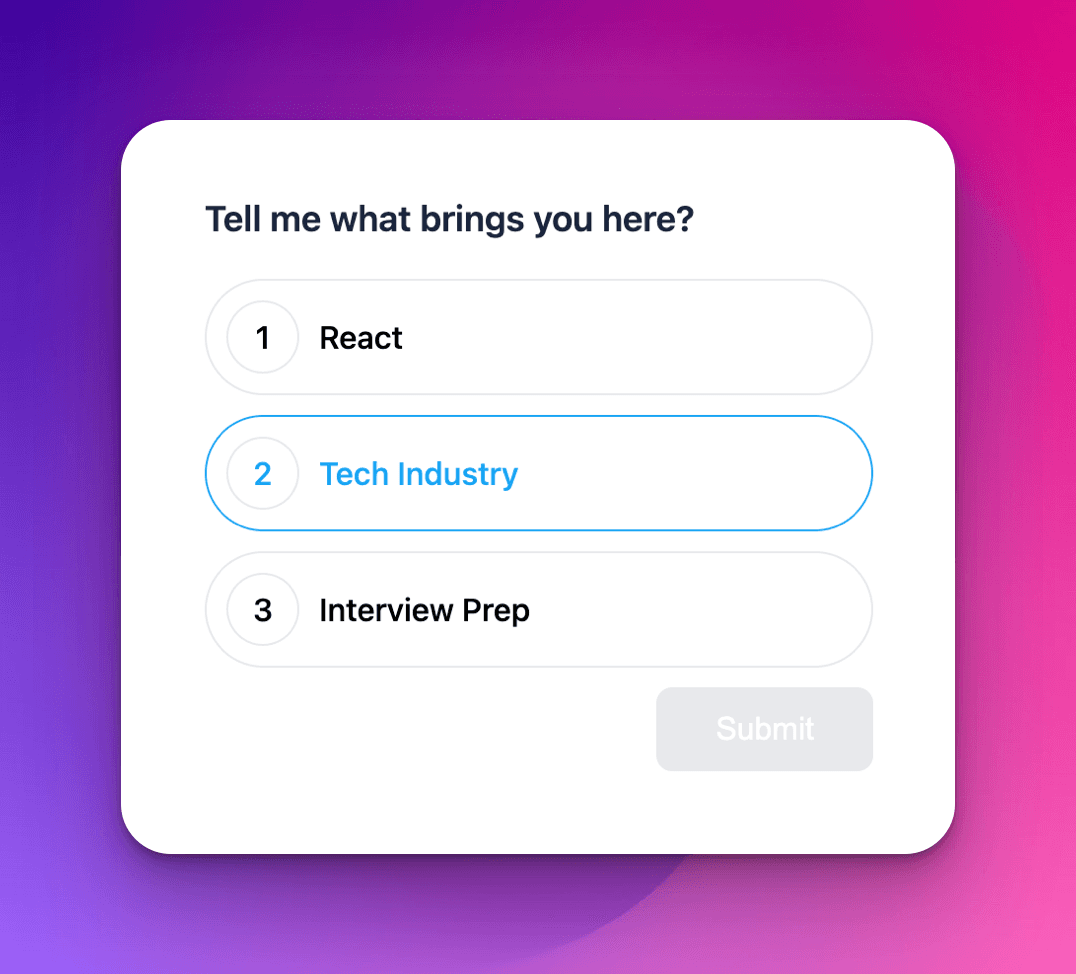
I figured another fast follow could be enabling quizzes in bytesizedpieces. I noticed on Twitter that my audience enjoys poll-style quizzes as a learning means and began to consider adding quizzes to my articles. After inquiring on Twitter about feature preferences, adding quizzes no longer was a question.
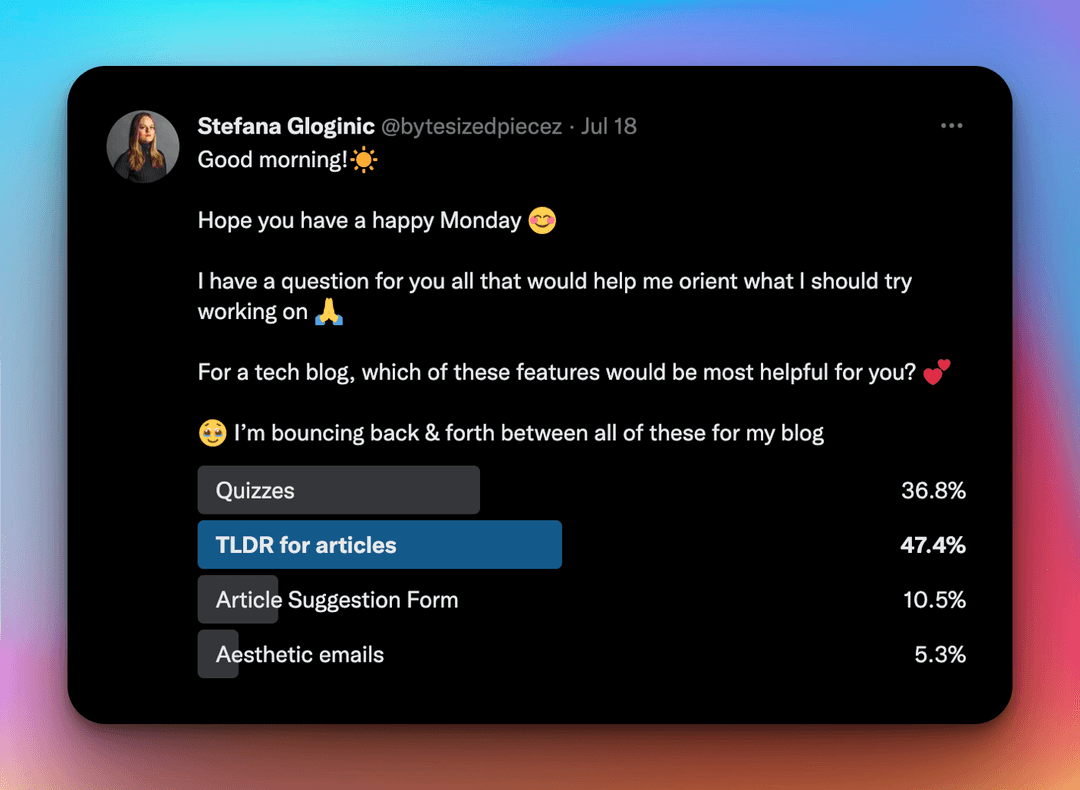
Quizzes (along with a TLDR option) on bytesizedpieces had to happen!
I decided to lean on Firebase to store my data, given I did not foresee bytesizedpieces becoming data heavy.
I set up a development and production intended database. I rely on an environment variable value to determine if I am in development or production for bytesizedpieces (recall we can set that up for NextJS) and utilize the appropriate API keys to communicate with my db.
From there, I set up a Firebase Singleton to retrieve, add, or update documents to the database, and leverage NextJS API Routes to achieve the desired effect. I wrote about how I created my Firebase singleton, and utilized the Firebase Trigger Mail Extension to automate emails on quiz submissions from users.
Miscellaneous Details
Custom websites need a few more details that I have been adding as I learn.
The primary recent two additions are:
- Sitemap
- Robots.txt
For my sitemap, I created a script that runs both at build time and can be triggered via CLI.
I followed the guidance offered in the following article and modified it to apply to bytesizedpieces.I write the sitemap to public/sitemap.xml and check its working by submitting manually in google search console while assessing for a success status.
These two files are necessary for google to find and index my articles!
Conclusion
In summary, I've managed to leverage quite a few technologies to build bytesizedpieces. However I feel I've succeeded with achieving my goals of making a blog that is easy to use and update, aesthetic, performant and SEO optimized!
Finally, I would like to mention the blogs that helped me understand what is necessary to run a custom well operating blog website:
- rishimohan.me his article nextjs-canonical-tag and discovered-not-indexed-fix were two very real issues I was seeing with my blog when conducting my SEO research and checking if Google was indexing my posts
- joshwcomeau original inspiration for MDX usage
Remember, developers are creatures that turn coffee into code. So I'd very much appreciate if you bought me a coffee!  I’m a new writer and I will be posting very frequently on my findings and learnings in the tech industry and beyond. Join my newsletter if you would like to stay tuned!
Thanks for reading again! ❤️
| Understand Open Graph Dynamic Image Meta Tags | 1 |
| Pros and Cons of Caching Data in Software | 2 |
| How to build a Modal in ReactJS (Part One) | 3 |