

The tech industry never stops expanding with alternate solutions. We see a beautiful landing page and get sucked into wanting to integrate these tools into our workflow. The problem with these solutions is that they sometimes can bloat our projects where this could be avoided. Sanity.io was one such product we recently came across that enraptured us.
Sanity offers a viable solution that unlocks rapid content release through a seamless and easy UI. Technical and non-technical individuals can work together, with little effort spent to custom-develop the resources needed. We envisioned potentially integrating Sanity into the ByteSizedPieces blog.
ByteSizedPieces Background Context
ByteSizedPieces was developed in a way that it would be lightweight, and cost-effective but still performant. Unfortunately, the website wasn’t user-friendly, or considerate of the time when it came to adding new content.The workflow for ByteSizedPieces expected a single individual to make a contribution and it took a lot of time to prepare articles for release. Articles were written on Medium for the ease of the editor and laboriously copied over into the expected MDX syntax.
This was not the best setup, especially considering ByteSizedPieces is run by a capable developer. Allowing time sucks like this to go on for long is unacceptable!
This is where we considered integrating Sanity into the ByteSizedPieces NextJS project. We were however reluctant to add yet another heavy dependency to the project when it felt like the problem could be addressed via a script.
Sanity vs custom script/small package
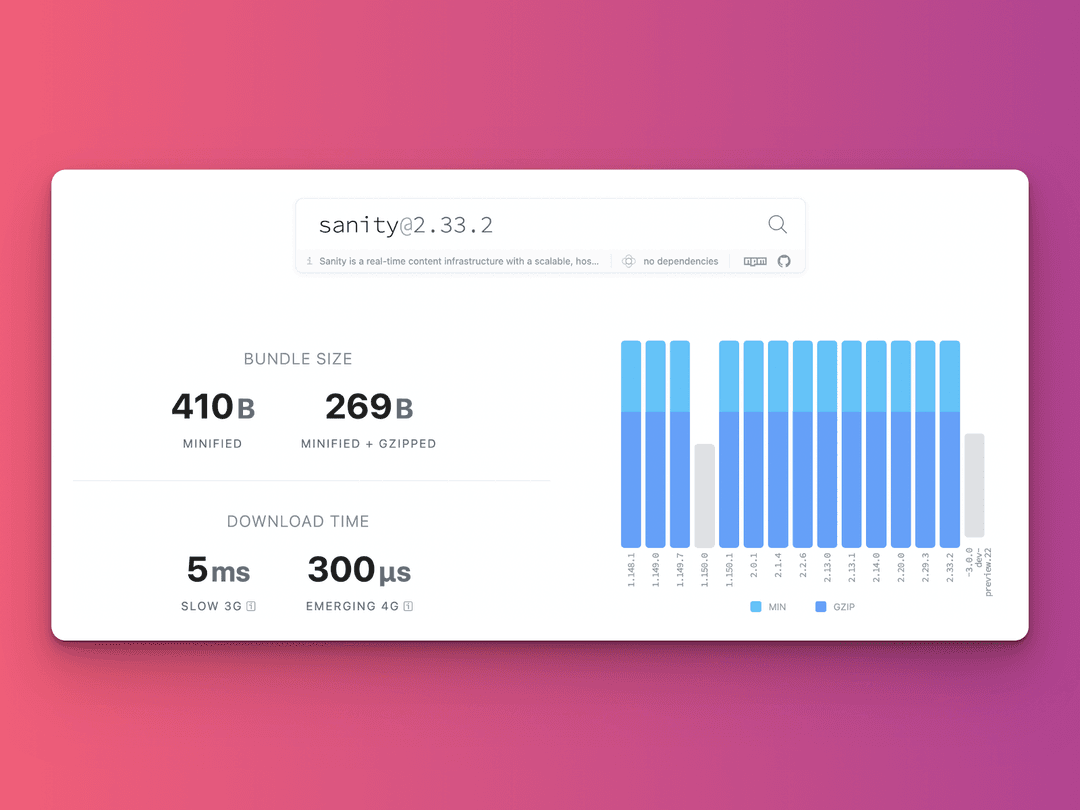
A quick check of Sanity’s stats on Bundlephobia showed a large minified bundle size of approximately 270 bytes.
Alternative to Sanity (generalize for other tools)
For every fully fleshed out product, there is a simpler solution that isn't pretty to look at but could realistically get the job done.
Let’s see how we can better match the priorities of ByteSizedPieces.
Because we use Medium as my editor, perhaps there already existed a solution that could transfer content on Medium to MDX syntax. This is the point at which we discovered medium-to-markdown.
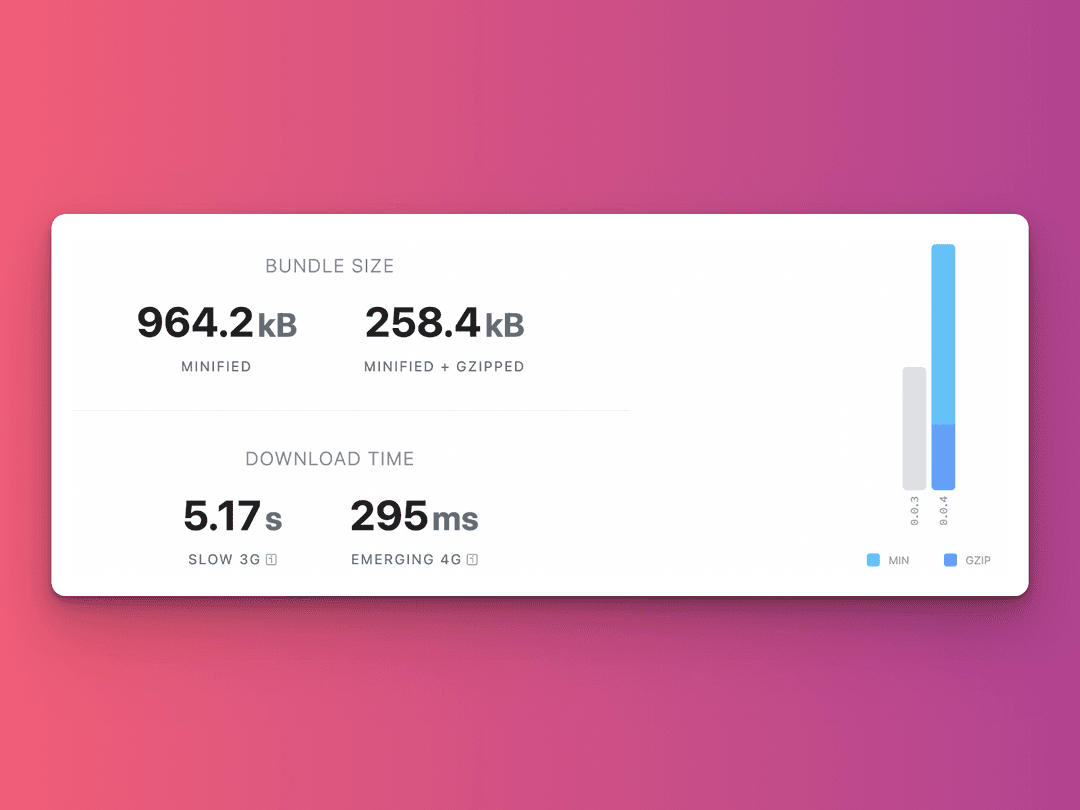
The difference in size between Sanity and medium-to-markdown is monumental. Observe that the bundle size of the minimized medium-to-markdown package is approximately 260kB.
Realize this observed bundle size discrepancy makes perfect sense. Solutions like Sanity pull in many other dependencies to create that aesthetic and intuitive UI that would become the admin portal for your content-driven website. Medium-to-markdown hones in on a specific problem and doesn’t offer much flexibility. This approach allows it to be such a light package.
For ByteSizedPieces, Sanity was overkill and would cause unnecessary bloat. Here is a fantastic article that breaks down why we should care about bloat for projects, and how we might go about reducing the size of our node_modules.
In a nutshell, recall ByteSizedPieces considers performance and cost-effectiveness. If we are not careful about unnecessary bloat, then our application becomes less performant over time. We additionally incur a greater cost for infrastructure management of the resources.

Medium-to-markdown package evaluation
With all this taken into consideration, we tried to proceed with this more straightforward solution for the time being. Let’s look into the medium-to-markdown package.
After some examination, we, unfortunately, discovered the package didn’t work end-to-end for the preferred ByteSizedPieces workflow. Our blog posts are intended only to be published on bytesizedpieces.com, and we learned that the script was only capable of parsing public, non-paywalled content on Medium.
Not a problem! We decided to take a look at how this script parses the content, and expand its capabilities ourselves.
Adapted medium-to-mdx script
We have the capability to evaluate how the script performs it's conversions, and adapt it to our needs.
Our priorities for our customized medium-to-mdx script are:
- Enabling the script to consume a draft link
- Parse mdx
- Setup rules for the custom elements ByteSizedPieces uses
- Add YAML template for gray matter to parse for article metadata
- Write converted contents to templates/ where articles are stored
- Generate new article route for sitemap
The medium-to-markdown package mainly relies on 3 dependencies to parse and translate medium content to markdown syntax. The 3 packages are Turndown (the library to convert HTML to Markdown), cheerio (parses markup and provides an API for traversing/manipulating the resulting data structure), and turndown-plugin-gfm (a turndown intended plugin that adds GitHub Flavored Markdown extensions).
The repository was simple enough to comprehend.
We have a series of converters that just focus on the DOM elements we would encounter in Medium which we would like to parse. For each of those converters, a turndownService appropriate rule gets added. A few more rules get added to the turndownService specific to encountering an anchor in Medium, and two more rules for images, and codeblocks.
convertFromUrl is the function to invoke, provided the URL of the public non-paywalled medium article. The package requests the URL, targets the body with cheerio then the article of the Medium retrieved content, and invokes the turndownService configured with the set rules. The turndownService will proceed to do its magic. The DOM tree gets parsed, and on a match of elements for which rules were set, the turndownService will invoke the set of handlers to map the elements to the appropriate replacement.Now that we understand how the package is accomplishing the conversion from medium content to markdown, we need to consider how we can adjust it to our use case.
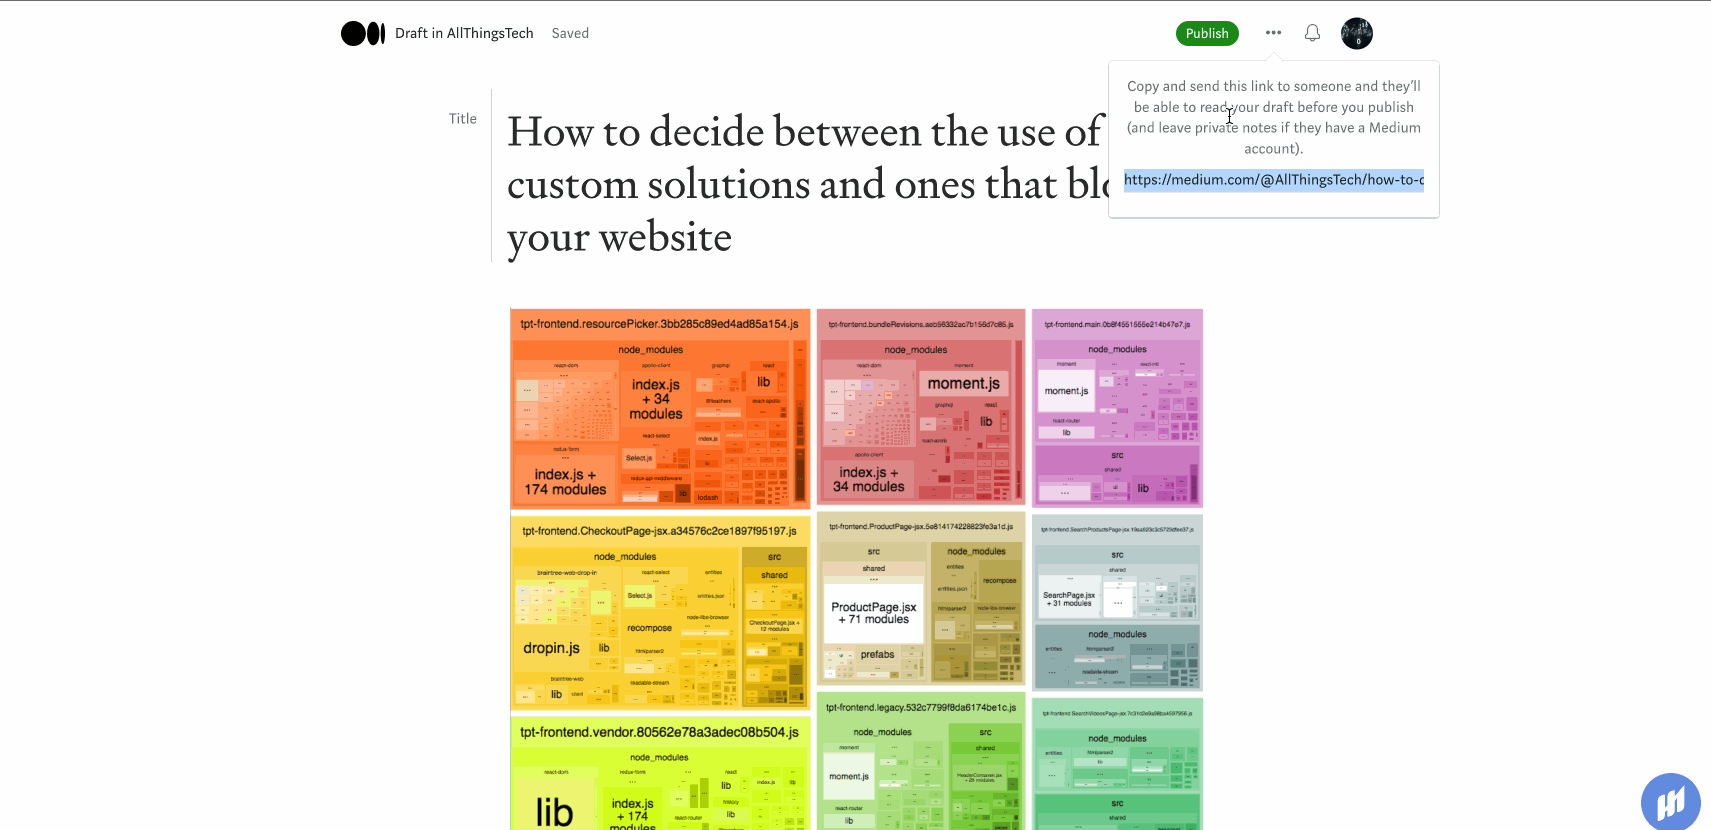
We recognize that the primary issue is unpublished content on Medium. Thankfully, Medium provides us with a way to expose these unpublished articles via a draft link.
The draft link is provided to another user with a Medium account, so we probably need to log in to a viable Medium account, and then attempt to visit the draft URL in the same session.
This is starting to sound like we need a headless browser. For this, we decided to use puppeteer.
Headless Browser Puppeteer Login To Medium Flow
- Tell puppeteer to start the browser
- Visit the home of medium
- Select the sign-in button on medium.com
- Sign in via Twitter option
- Have the page object input the correct Twitter credentials
- Visit the draft URL provided
Tell puppeteer to start the browser
For simplicity, I have removed the irrelevant code. To start, we have a navigateToMediumUrlWithLogin function, which will invoke loginToMedium and then after that navigate to the draft URL. loginToMedium will start the browser and page via puppeteer and return those relevant values.
async function startBrowser() {const browser = await puppeteer.launch();const page = await browser.newPage();return { browser, page };}...async function loginToMedium(url) {const browserPageObj = await startBrowser(); ...}...export const navigateToMediumUrlWithLogin = async (url) => {let browserPageObj = null;try {browserPageObj = await loginToMedium('https://medium.com/');} catch (e) {}};
Visit the home of Medium
Next, we need to visit Medium using the page we received from startBrowser . Our loginToMedium will now be adjusted to accommodate this next most intent.
async function loginToMedium(url) {const browserPageObj = await startBrowser();const { page } = browserPageObj;page.setViewport({width: 1366, height: 768});console.log('Navigating to: ', url);await page.goto(url);...}
Select the sign-in button on medium.com
Still focusing on loginToMedium we now need to select the sign-in button on medium.com.
Here is how we accomplished selecting the sign-in button:
async function loginToMedium(url) {...const [ anchor ] = await page.$x("//a[contains(text(), 'Sign In')]");if (!anchor) {return;}console.log('Selecting sign in prompt at: ', url);await anchor.click();await page.waitForTimeout(200);...}
Select login via the Twitter button
Now we need to select how we want to log in. Let’s go with Twitter.
async function loginToMedium(url) {...const [div] = await page.$x("//div\[contains(text(), 'Sign in with Twitter')\]");if (!div) {return;}console.log('Selecting Sign In With Twitter Prompt on popup at: ', url);await div.click();await page.waitForTimeout(2000);...}
Have the page object input the correct Twitter credentials
We are almost done with the flow. We now target the input fields for the Twitter username and password and populate those fields for the account we prefer.
We return the browserObject with the page at the result after signing in.
async function loginToMedium(url) {...console.log('Populating Twitter credentials, username first');// for twitter login populate usernameawait page.click('#username_or_email');await page.keyboard.type(credentials.TWITTER_USERNAME);console.log('Populating Twitter credentials, password next');// for twitter login populate passwordawait page.click('#password');await page.keyboard.type(credentials.TWITTER_PASSWORD);console.log('Attempting to sign in via Twitter profile');await page.click("#allow");await page.waitForNavigation();return browserPageObj;...}
Now that loginToMedium is complete, we can proceed with visiting the draft URL we were provided.
Visit the draft URL provided
We divert our focus back to thenavigateToMediumUrlWithLogin function. It will use the returned browserPageObj to visit the provided URL which is our draft URL, then finally return the browserPageObj that should be in the correct context and ready for parsing.
export const navigateToMediumUrlWithLogin = async (url) => {let browserPageObj = null;try {browserPageObj = await loginToMedium('https://medium.com/');} catch (e) {console.log('Something happened while trying to login to medium', e.message);return browserPageObj;}await browserPageObj.page.waitForTimeout(2000);console.log('Now attempting to visit url: ', url);await browserPageObj.page.goto(url);return browserPageObj;};
For this, we have a getMarkdownFromPage function, that we will utilize to pull the HTML from the puppeteer page, use the turndownService to convert to markdown, and write the contents of that markdown to our desired file.
Here is where we tie all of this together. Our script will effectively be calling convertUrlByLogin to retrieve the markdown and write the contents to a file.
// retrieve the correct page after successful navigation// to medium draft url (which requires login)// from there seek out the article element and use// turndownService to convert to markdownexport const convertUrlByLogin = async (url) => {const browserPageObj = await navigateToMediumUrlWithLogin(url);return _getMarkdownFromPage(browserPageObj);}
What is neat about pursuing this approach ourselves instead of relying on the medium-to-markdown package, is that we can custom configure our rules to the turndownService. So we did add our own rulesets so the new elements we map during match occurrences are ByteSizedPieces appropriate.
Perhaps you noticed, why stop at markdown? ByteSizedPieces uses MDX. Although MDX enables the usage of markdown, it enables the usage of React components too!
Our turndownService rules can thankfully provide the React components since they are provided as strings anyways. MDX will be able to correctly handle once our script writes the contents to a file.
Here is an example of a rule set for processing Medium images since ByteSizedPieces uses a custom component for images.
{ // NOTE: This entire rule is bytesizedpieces specificruleName: 'images',filter: (node, options) => {return (node.nodeName === 'IMG' &&node.getAttribute('src') &&!node.getAttribute('src').endsWith('?q=20'))},replacement: (content, node) => {const parentWrapperDiv = node.parentNode;let parentNode = null;if (parentWrapperDiv) {parentNode = parentWrapperDiv.parentNode;}const captionLabelIdSibling = parentNode ? parentNode.nextSibling : undefined;let captionLabelId = '';let innerText = '';if (captionLabelIdSibling && captionLabelIdSibling.nodeName === 'FIGCAPTION') {innerText = captionLabelIdSibling.textContent;}if (innerText.length > 0) {captionLabelId = innerText.toUpperCase().split(' ').join('_');}return '<Image captionLabelId="' + captionLabelId + '" alt="' + innerText + '" src="' + node.getAttribute('src') + '" />';}
For each article we add some YAML at the top of our files to define some metadata that gray-matter parses for us.
Knowing this, we added some logic to insert a YAML template at the start of our newly created file. Later we intend to make the script smarter to attempt to autofill some of these fields, but a template works nicely for the time being.
Here is how the final script looks.
const generateMdFromMediumArticle = async (fileNameArg, mediumPostUrlArg) => {if (!fileNameArg) {throw new Error('Need to provide file name to convert as argument');return;}if (!mediumPostUrlArg) {throw new Error('Need to provide url for medium article to convert as argument');return;}const PATH_FOR_CONVERTED_MD = `${POST_TEMPLATES_FOLDER_NAME}/${fileNameArg}.mdx`;const markdown = convertUrlByLogin(mediumPostUrlArg);if (markdown && markdown.length > 0) {const prettierConfig = await prettier.resolveConfig('./prettierrc.js');const formattedMarkdown = prettier.format(markdown, {...prettierConfig,parser: 'mdx'});writeFileSync(PATH_FOR_CONVERTED_MD, `${YAMLTemplate} \\n \\n ${formattedMarkdown}`);console.log('Success, file written and should be found at: ', PATH_FOR_CONVERTED_MD);return;}
Finally, here is what I added to package.json
“mediumToMdx”: “node ./scripts/convert-mdx-from-medium-url.mjs && npm run postbuild”
Note that we developed the script in such a way that when it starts up, it prompts the user for the name of the file they would like to create (which will become the route by default for the article) as well as the URL to the medium link. These arguments get passed on to generateMdFromMediumArticle to take it from there.
As a final callout, note postbuild being added after the conversion script runs. We wanted to kill two birds with one stone by first writing the new file, then generating an update to the ByteSizedPieces sitemap for search engines to reference for indexing purposes.
Sitemap generation is yet another script we added to increase efficiency in the development of the blog, and will be covered in another article.
Let’s see this in action in this very article! Observe how I retrieve the draft link from Medium, start up my script, and show the final markdown transferred result.
Conclusion
So! What do we gain from this effort?
Transferring an article to ByteSizedPieces was laborious and took approximately an hour worth of time.
Adding this custom script cut the effort of transferring an article to ByteSizedPieces to 5 minutes.
The script is not perfect, after the file is generated we need to still go in and make a few edits. The effort to edit and validate the article comprises the majority of the 5 minutes. The script itself runs in ~20 seconds.
Those 55 minutes saved enable us to divert efforts elsewhere for more meaningful content and changes!
The final lesson here is to keep an open mind when deciding what to custom-develop and when we should be using tools. Always bear in mind your original goals and stay true to them.
This script took about 4 hours to get working end-to-end. Though it can use improvements that will happen in time, it works beautifully and saved us from adding a heavy package to ByteSizedPieces.
| Understand Open Graph Dynamic Image Meta Tags | 1 |
| Pros and Cons of Caching Data in Software | 2 |
| How to build a Modal in ReactJS (Part One) | 3 |